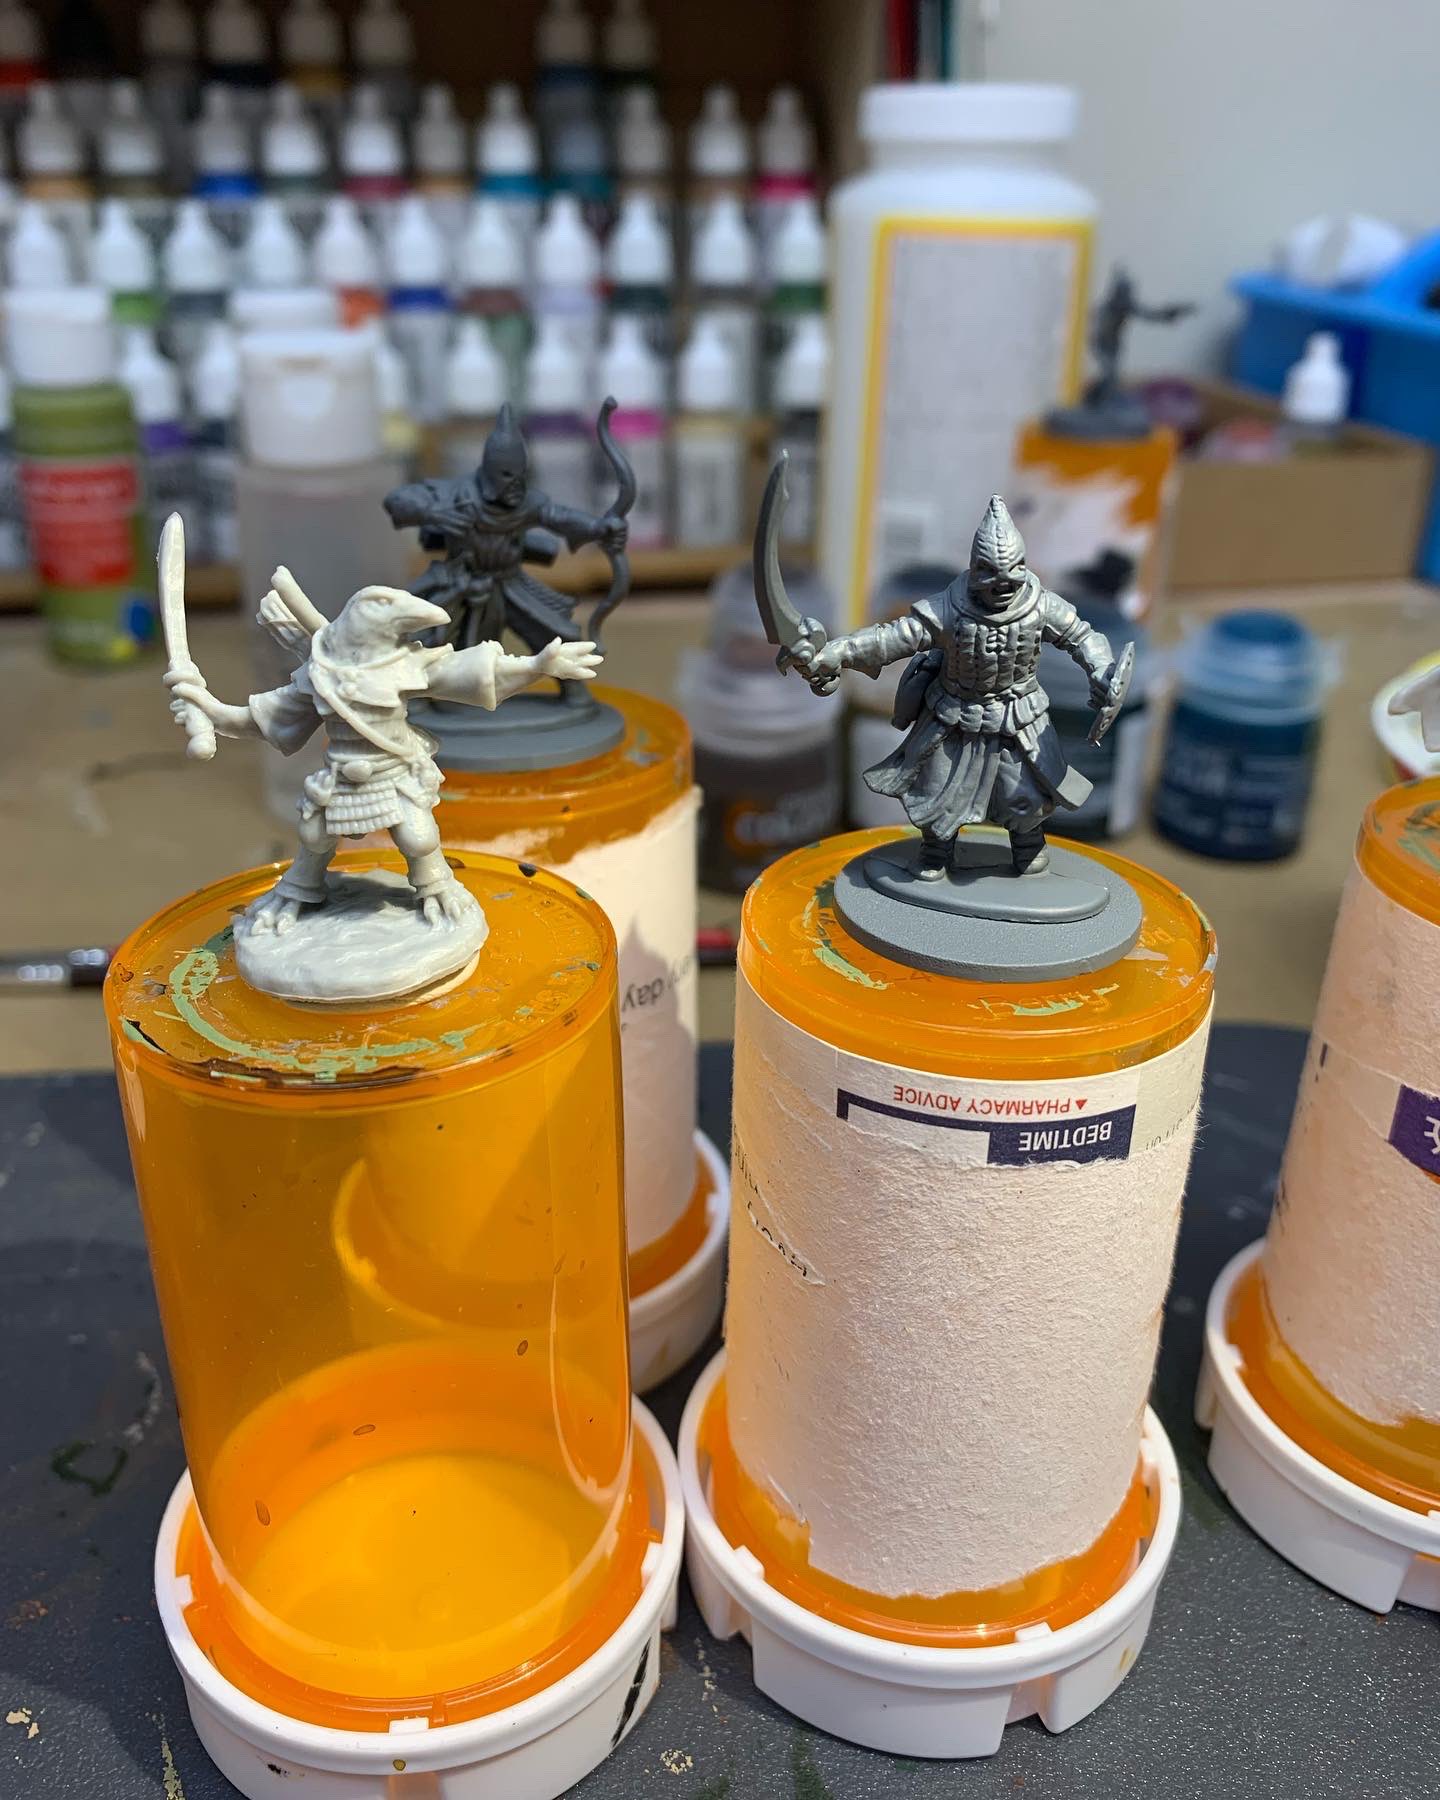
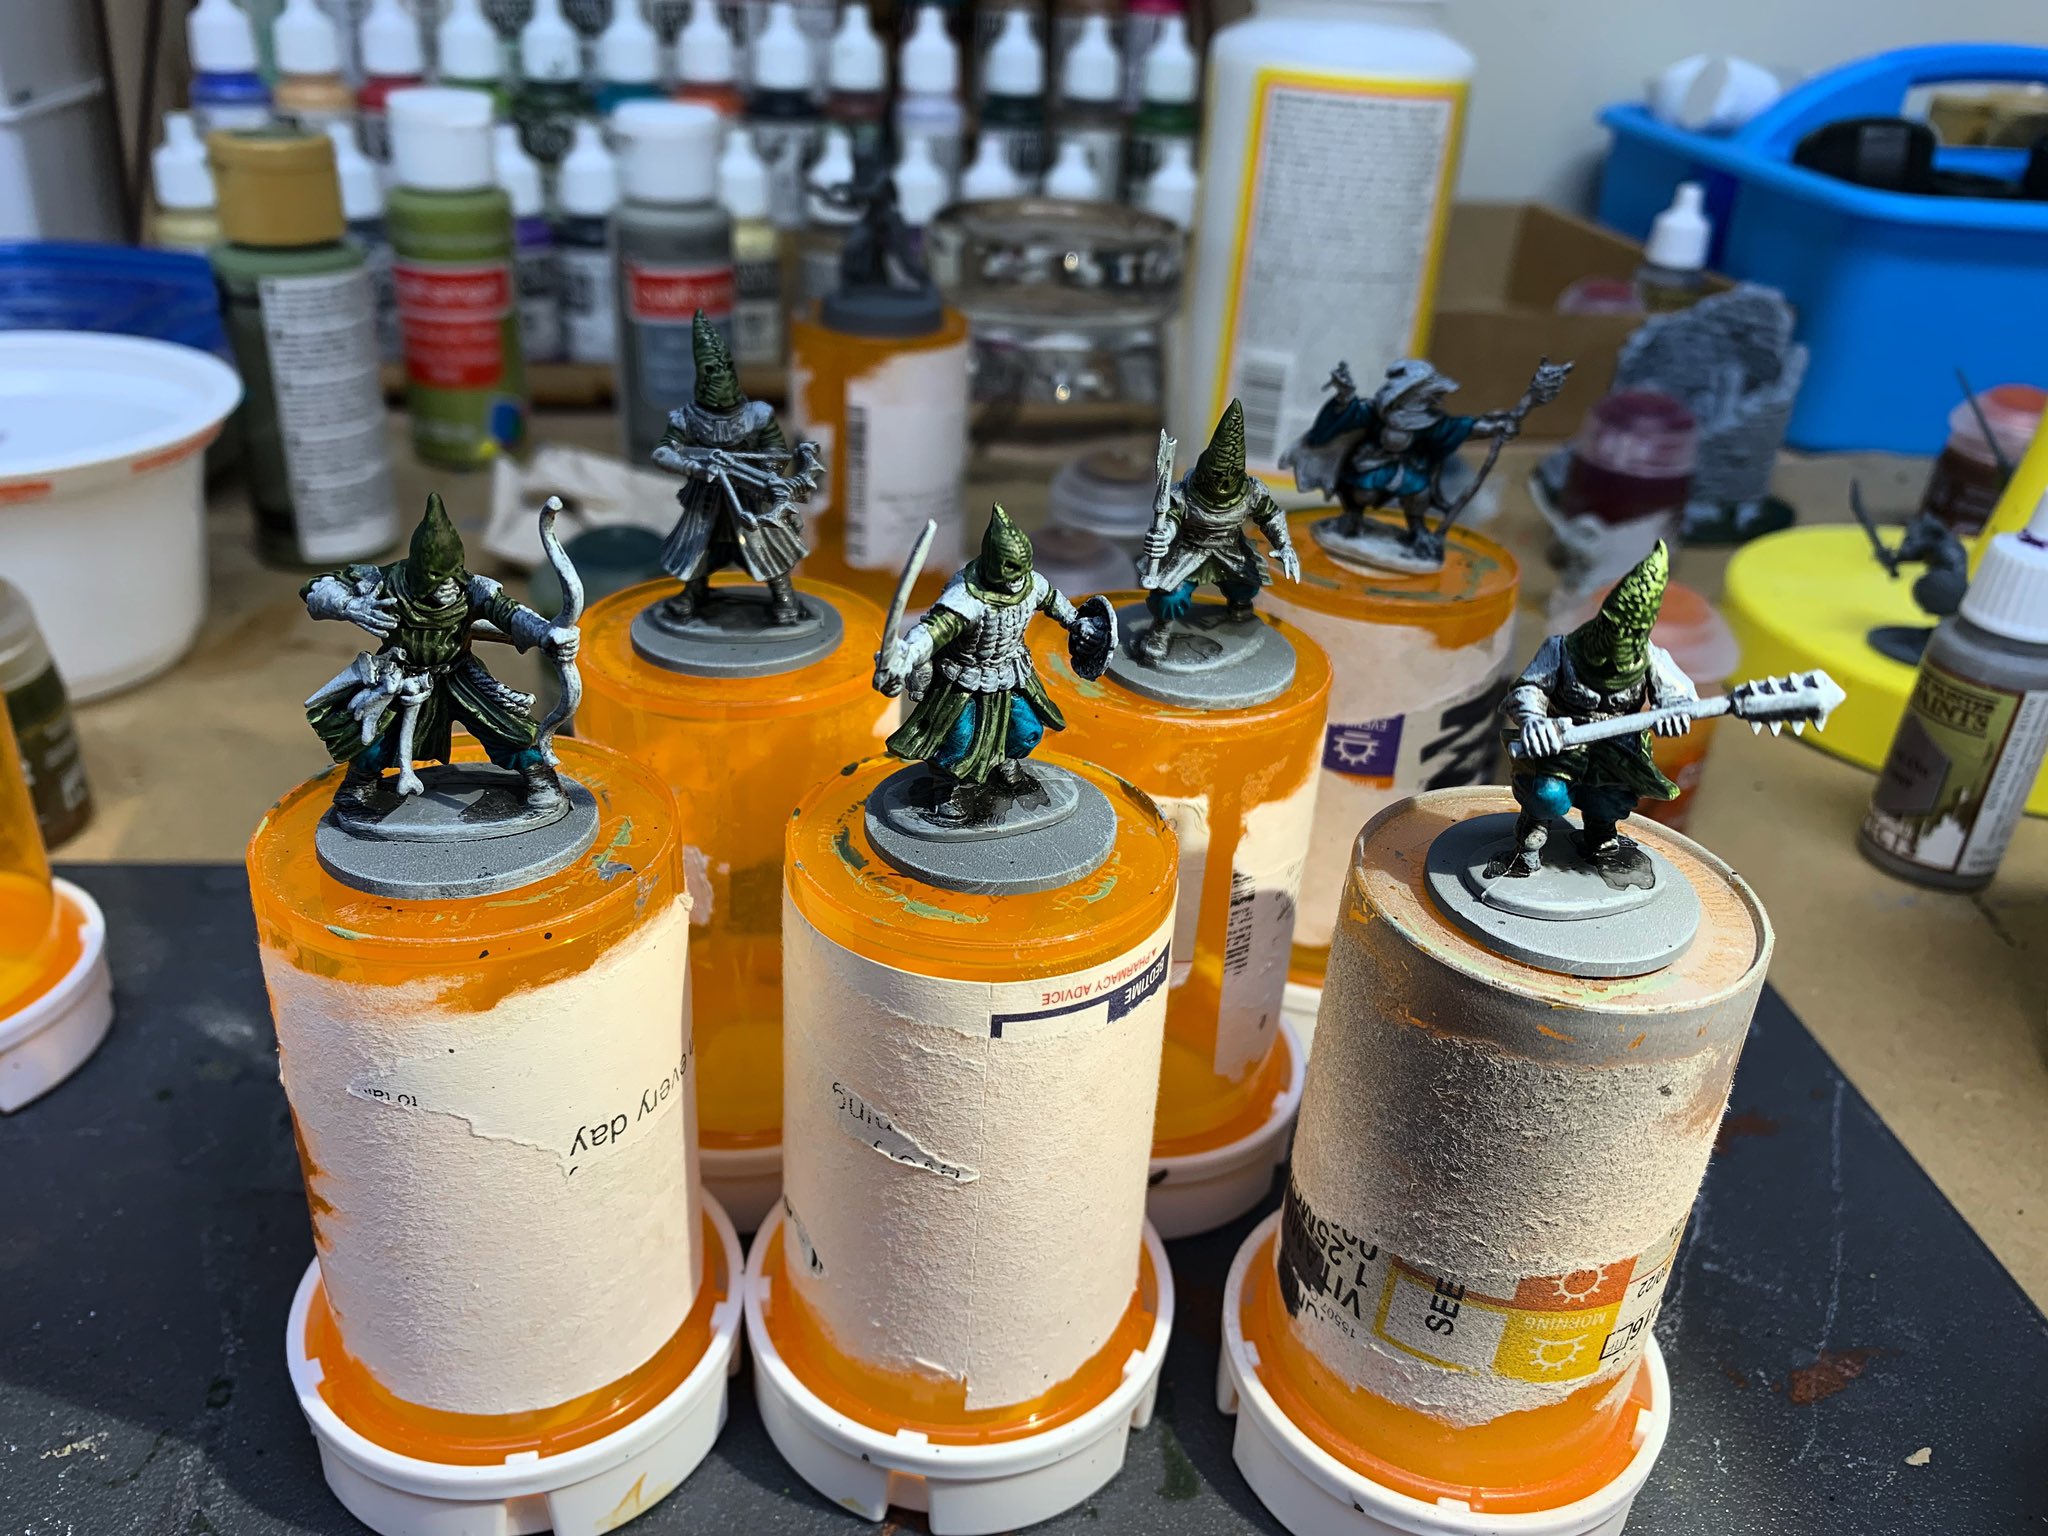
Category: 15mm
Contrast Paints
A while back I mentioned a new type of product on the market, contrast paints. Essentially it’s a paint-medium mix that is more of an intense glaze. The idea is the paint flows easily over a surface, gathering in cracks and having a thinner coat over raised surfaces. What you would usually get with a base coat and wash, you could get with a single coat of contrast paints. Additionally as it’s more transparent that your typical paint, you can get a slight highlight effect too.
Aside from Games Workshop, Vallejo and Army Painter have also thrown their hats into the contrast paint ring. I’ve only dabbled in using paints from GW and Vallejo so far (and I’ve fallen in love with the Vallejo Xpress paints). I steered clear of Army Painter due to issues of the paint reactivating when it becomes wet. There are workarounds with the Army Painter Speedpaints to minimize this, but the property of these contrast paints was pretty much a deal breaker for me ever buying them.
The concept of contrast paints is to use a neutral primer as an undercoat. And then pretty much lay down coats of contrast. As the paints are a little transparent, you really can’t paint over existing coats with different colors unless you are looking to mix hues to get a different shade. Instead you need to apply an undercoat and repaint. So if making some mistakes, it’s best to have brush-on primer handy in a shade similar to the undercoat being used, touch up any whoopsies, and keep painting with contrasts.
Working with contrast paints has been a learning experience though. Generally you can get away with using it directly from the pot. But depending on the pigmentation intensity you are going for, you may need to carefully thin it some with water and/or contrast medium. I found it better to work with lighter shades first, and then use darker shades so that you might be able to bypass touch ups with primer entirely.
The GW contrast line dries quickly and works best steadily painting to cover an entire section of a surface while it’s wet, before moving onto other parts of a model. If say, painting only half a space marine shoulder pad, you might get some uneven results coming back to the other half once that section dries. The portion you painted previously might get some brush strokes and repainting over those parts can impart a darker hue, potentially making that desired color you are striving for a little uneven.
I also learned that a single undercoat just wasn’t enough to bring out the depth possible with contrast paints. I tried first drybrushing white over gray primer. This helped in bringing out the highlights of a model allowing the contrast paint to work better as a glaze.

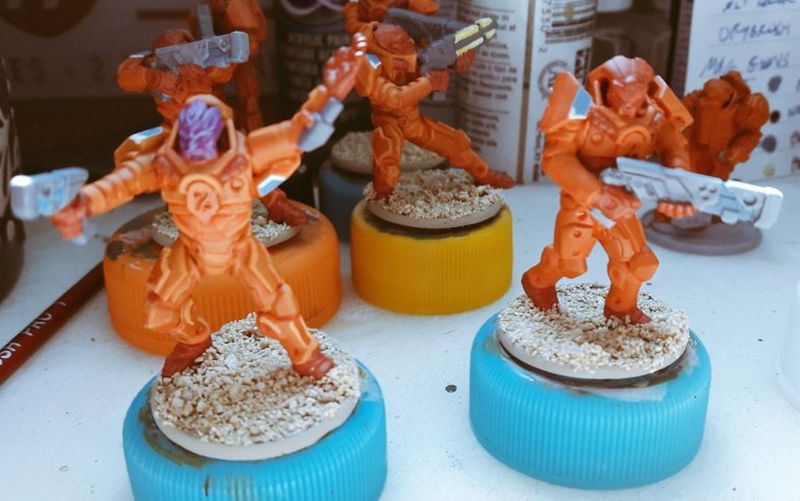
However I still wasn’t quite happy with the depth of color for the models as you can see with these battle mechs I worked on. I will freely admit though that it could have been the particular GW contrast paints I was using. Maybe thinning it out more would have worked better.

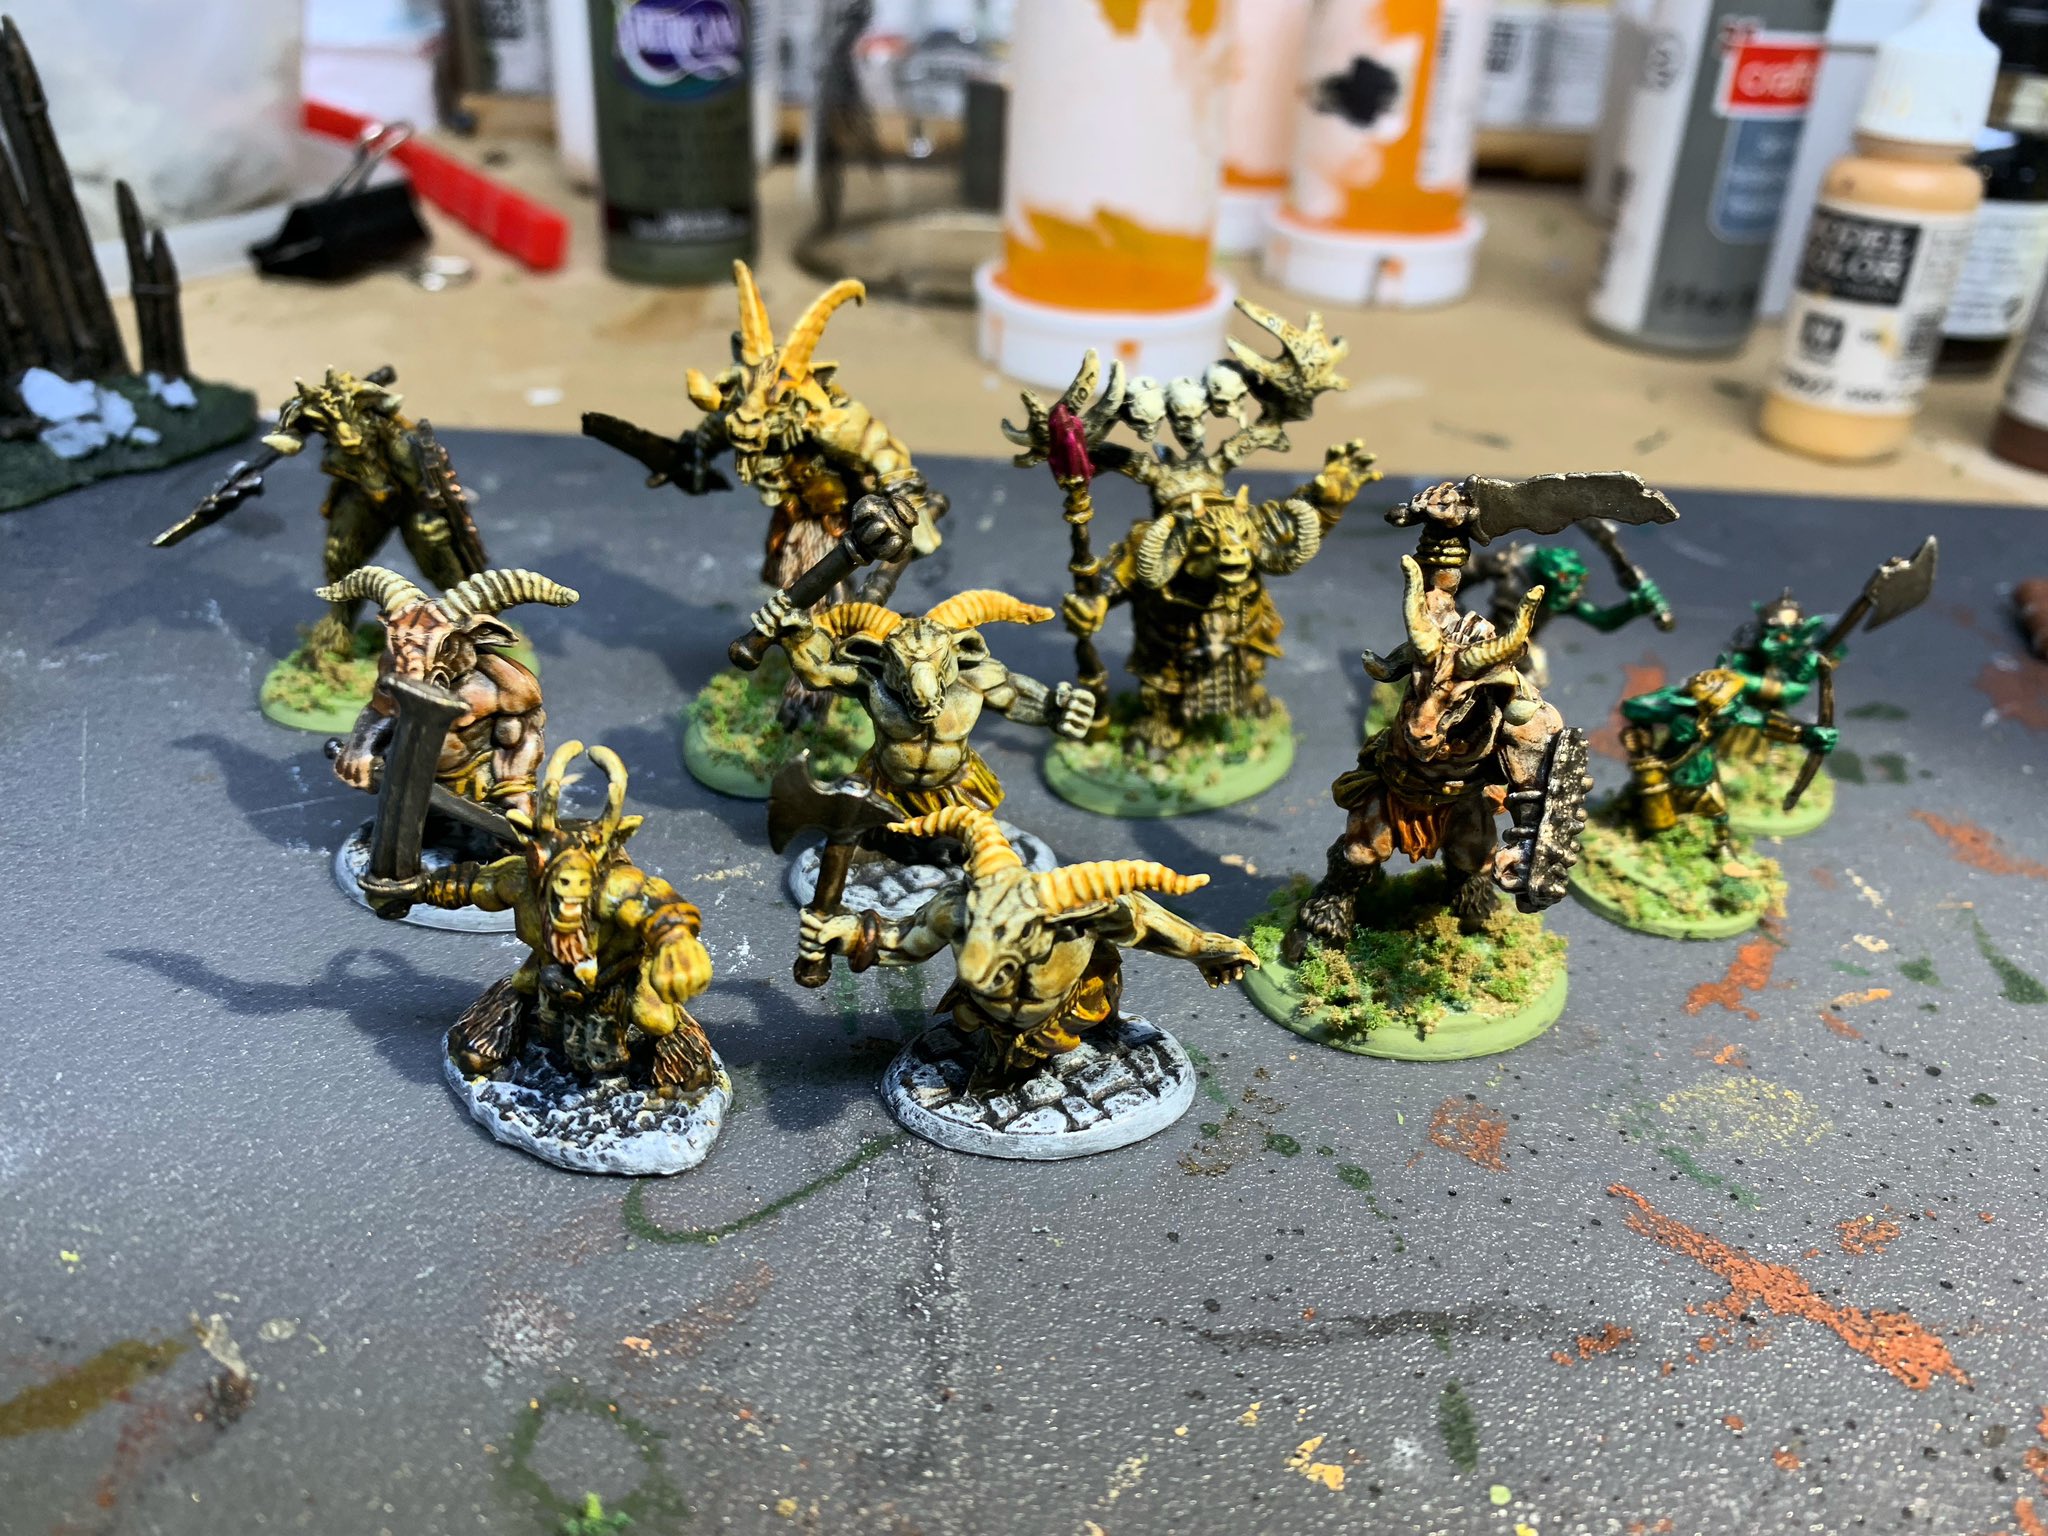
On the interwebs though was the slapchop method. The concept was using a darker undercoat with white highlights obtained through drybrushing. I used a gray undercoat followed up with a thin black wash.

Finally doing a copious white drybrush. The key is to try and leave the recesses of the model black, and give any raised sections a nice highlight of white. This immediately provides a foundation that has a fair amount of depth that will be enhanced with the contrast paint.
You can see with these cultists, the properties of the contrast paint easily give models with this undercoat method a great look. The nooks and crannies of the model get that deep tone of color, while raised sections with the white base coat have more depth over other areas on the mini. I could get a fair amount done with a single coat over different sections. And as the paints flow well and cover quickly, I could also get models painted up much faster than using conventional paints.

Hands down, using contrast paints will not give you the vibrancy and shadows that the Big Three offers. You cannot get the depth on a model that you normally would using blending. But if wanting to get a fair amount of minis painted to tabletop standard, contrast paints are an excellent choice. I had seriously thought of just giving a horde of my Zombicide minis a simple wash. Now I’m thinking that a quick coat of contrast paints instead would make them look fantastic. If looking for a means to get a fair number of models painted efficiently and still look pretty nice, contrast paints are worth looking into.
Review: Five Parsecs from Home
As I’ve gotten older and my schedule filling up with non-gaming activities, I’ve found my flexibility to game with other people waning. So over the past few years I’ve been leaning more towards games that have a solo component. It’s much easier to have a table set up where I can putter down to the basement for a few hours during the week, instead of trying to coordinate with folks on where and when to get a game in. For board games I’ve got loads of choices but for miniature wargames there hasn’t been many options. I stumbled on Modiphius Entertainment’s Five Parsec from Home and was eager to give this sci-fi skirmish game a shot.
It’s an interesting game as it leans heavily on roleplay elements. You create a crew of individuals, one of which will be the captain that much of the game revolves around. Each member will have a basic profile characterizing their movement, combat ability, how quick they react, and a general stat for non-combat events. There are options for different alien races and a bevy of gear and equipment, all of which is generated randomly on a series of charts and tables.
For the meat of the skirmish game itself, you play on a table somewhere between 2 to 3 feet square. A good amount of terrain will be needed to break up line of sight. You’ll have roughly 6 crew members matched against a random number of opponents (usually about 3-8). The game will have some manner of a win condition and is played over rounds.
Each round you will roll for reaction, assigning each die roll to a crew member. You are trying to score equal to or less than a crew’s value. This allows you to act before your opponent. You can also have a crew member hold an action, interrupting the opposition’s turn with fire, or even just hold off till the end of the round. After initial quick reactions (if any), the opponent acts. Every figure activates once. Finally the player’s crew will have a turn with any remaining members activating if they haven’t done so.
An activation is a move and shooting or melee, just attack, or go on a full out sprint getting a little extra movement for the round. Ranged combat is dead simple using d6 and true line of sight. Close up, without cover hits on a 3+, 5+ to hit targets in the open at range, with most rolls needing a 6 to hit while in some manner of cover. The number of dice will match a weapon profile, adding the unit’s combat ability. Simple.
If a unit is hit another d6 roll is made adding the weapon’s damage value that is compared to the target’s toughness. Rolls equal or greater than the toughness will essentially take the model out of the fight. Otherwise they take a stun marker. Units with stun markers have limits on the actions they can take the following round (and then the stun marker is removed). But if a model gets 3 or more stun markers, they are removed from combat. Basically they are knocked out and removed as a casualty. Melee combat is resolved similarly but the opponent will get a chance to exchange blows.
Combat is brutal, quick, and easy to resolve. You’ll find yourself jockeying to get into position, hoping to get that quick reaction roll so you can provide overwatch while other members of your crew maneuver towards the objective. The opponent’s actions are governed by a simple AI that will dictate how aggressive they advance, adhere to cover, and what formations they will use on the table. The tactical rules are pretty bare bones and simple. What pairs wonderfully with this are the campaign rules.
See the game has a strong story theme. You are managing a starship crew and the resources needed to keep them going. You define a rough goal for the campaign picking from a list. This might be to earn so many credits, or as simple as playing a certain number of campaign turns. You measure resources as abstract credits. Each campaign turn you have to pay upkeep for your crew which increases if over 6 members. Your starship has a sort of mortgage that will increase until the debt is paid off. Damaged equipment needs to be repaired (or dumped as a loss) and injured crew members will need treatment.
Each campaign turn you’ll have crew members undertake different tasks. This might be to try to barter for equipment, seek out information and opportunities for big scores, or recruit new crew members. Every campaign turn you will automatically get a job opportunity, but you really want to obtain patrons. Patrons offer more lucrative payouts and potentially other benefits for completing operations. Job opportunities dry up? Get too many local rivals? You can pack up and jump to another planet.
This leads to how the tactical game plays out. Each mission will have an outline of a random objective and forces you’ll be fighting. Objectives might be to obtain a specific item, get crew members across the opposite table edge, or simply eliminate the opposition. This is paired with a randomly determined group of enemies and other battlefield conditions.
Complete the mission objective and you get a decent payday along with some loot. Fail a mission, you’ll get a few credits but it’ll mean losing a patron and a tighter budget for the next campaign turn. Crew members that survive will earn experience which can be used to improve their stats. Over the game you’ll have crew members develop, get better gear and weapons, and sadly, some will be removed as casualties. All of this is done through random charts that results in an evolving, narrative experience that makes the game shine.
And the potential outcomes are so varied. You can gain rivals, suffer a planetary invasion, get information on a juicy job, or a snippet of data that leads to an extended quest where you’ll keep seeking out rumors until you get the MacGuffin, earning a big reward. Crew members can suffer a bout of PTSD and sit out a mission or two, gain a skill, or other noteworthy life event. There are a series of charts you’ll be rolling a d100 for, continually evolving the trials and tribulations for your crew.
It’s paired with light resource management. Aside from gear and equipment, you also have credits. This part reminds me some of the classic solo microgame, Barbarian Prince. You are ever striving to balance credits needed for maintaining your crew and ship, and spending them for better equipment and skills. A windfall job can help get you out of debt, paying off your ship. Or a mission can be disastrous, having crew members tied up in the medbay or with damaged gear, leaving the hard choice of either cutting them loose or spending more of your precious credits to get them on their feet again. As a solo experience, it’s a lot of fun. Best of all there are also other more narrative elements like luck and story points which can be spent to mitigate a bad die roll some. So if you think you’ve gotten hosed with a streak of bad luck, there are ways to counter it. But like credits, their supply is limited.
The Good – It offers a grand experience that borders on being a roleplaying game. There’s a lot of choices with a touch of resource management each turn of the campaign. It’s matched with a tactical wargame ruleset that is fast and engaging. With varied opposition, battlefield conditions, and objectives this randomness increases the replayability. Best of all the actual battles flow pretty quickly with just enough tactics to make it enjoyable without bogging the experience down with lots of simulationist rules. It’s great fun expanding the abilities and gear of your crew, ever on the hunt for that next big payout.
The book is colorful with pleasant art. While an index isn’t present, the rules are sectioned off in different colors making it easy to go through after some familiarity. Another huge plus is the game is miniature agnostic. Any figures will do and the game works well in 28mm or 15mm without having to turn rules into pretzels for ranges.
The Bad – The rules are pretty well laid out but it can take some time to fully grasp everything. There are a lot of procedural charts which are rolled on and the first few times can be difficult to navigate everything. You are going to have a fair amount of bookkeeping to keep track of gear, cash, and other game resources. Lastly, the actual rules for playing the wargame portion are pretty thin. Some fights can be blown through so quickly, it might border on being anticlimactic. I could see the argument that as a skirmish wargame ruleset, it would be too light for some tastes.
The Verdict – Five Parsecs from Home is a wonderful solo sci-fi game. You aren’t going to get a meaty tactical AI experience here like with Star Army 5150. But it’s enough for a quick, brutal gun fight with enough gear and abilities to keep it interesting. Plus I love the idea of units sticking to cover as much as possible, risking that mad dash across open ground to get to an objective. All the while hoping your mates can offer enough suppression to stave off any incoming fire.
It’s paired with an enjoyable campaign ruleset. You will have a few random events, but also each turn mull over the choices to send off crew members in hopes to achieve some task. Do you settle on taking the regular opportunity job? Or do you put time and resources into finding a patron that will offer more lucrative pay? Do you spend credits and time trying to repair equipment? Or let it go and see what a crew member can find on the local market? Lots of fun choices. Lastly, if you think you’ve garnered too many enemies and dried up your prospects, you can always fly to another planet to see what awaits.
The battles also have a fair number of core objectives you need to achieve to win. And on top of that are several profiles of enemies you’ll be fighting against. The variety is impressive for such a modest rulebook. For me that is the selling point. It’s not some deep story, but Five Parsecs from Home sells a narrative experience. Over time you’ll see your plucky crew of adventurers and mercs improve, get better gear, and slowly accrue riches and fame. I am pleasantly surprised how much is packed into the rules. Well worth checking out if you are looking for a solo, sci-fi, skirmish wargame.

Packing Miniatures for Shipping
A while back I’ve moved and ended up relocating on the other side of the globe. I had quite a bit of trepidation moving all my miniatures. I use a fast and loose way of storing my figures in plastic boxes, layered on bubble wrap sheets. Good enough to keep the paint job protected but only if the box is kept upright. If I dump it on its side, the figures are going to shift around. Throw in a bunch of jostling of the box and you can expect figures to be clanking against each other (and on the inner sides of the container). I totally expected that my shipped stuff would be tossed around like a beach ball, and stacked sideways or upside down in a shipping container that would make any Tetris player proud.
So I had to try to work out a solution and stuck with bubble wrap. Cutting small sheets, I rolled each figure in wrap with a bit of tape to keep it in place. The key is to make sure it’s lightly snug and not wrapped too tightly. For plastic figures especially, you can inadvertently bend or snap off fragile parts like rifle barrels so don’t wrap too tight. Some figures can even be wrapped two to a sheet, particularly prone figures by having the bottom of their bases facing each other. I dumped them in hard plastic containers, sealed the tops in packaging tape, and was good to go.
It did take some time. Don’t expect to do this in a night. Set time aside to do it. At a leisurely pace, I was able to get about 300 figures completed in a week. I cranked out a lot of figures just watching TV an hour or so a night. You certainly want to get this on your to do list for early packing though. Vehicles and tanks were done similarly, but I made sure to remove turrets and wrap them separately.
How did they ship? Just fine. Granted you have to be prepared to snip tape and unwrap a ton of models (more things to do while watching movies). But I can say my figures, both metal and plastic, made it across the world in one piece.
So if you have the time, consider this a solution for packing your miniatures. While you can buy expensive cases that can keep your figures snugly packed individually in foam it can be costly. For a budget (and a ton of models), wrapping minis in bubble wrap is a cheaper workaround.

Painting Miniatures: Varnish
This is the last post of my miniature painting series. Last time we touched some on varnish, especially if using flock on your bases. A critical final step for your miniature is sealing the model in a coat of varnish. Even with a good coat of primer, typical handing of your mini during gaming can cause the paint on your figures to rub off.
With a varnish coat, you can protect your models and have them keep their amazing paint job for years. There are two routes people go with varnish. Some use a gloss spray, and then give it a quick layer of dull coat. I go the lazy route and simply use a single coat of matte varnish spray.
I’ve used more expensive stuff for models like Tamiya and Testor’s, but found Krylon a good choice. Like spraying on primer, you want to mix the can well and do it in weather that is not too cold. Go for an even coat, spraying not too close to the figure, and making sure to cover all the angles of the model.
A matte spray varnish will dull shiny paint jobs. Something that can happen if using ink washes. The varnish will also act as a sealant and adhesive for flock on the bases of your mini. There is one critical point with giving models a coat of varnish though, beware of humidity.
A decent amount of humidity can result in a horrible white misting or ‘frosting’ on your mini. There are some ways to restore your paint job if this happens. However it’s best to avoid it in the first place. If worried about humidity, you can paint a popsicle stick black and give it a test coat of varnish to ensure humidity won’t be a problem.
If you live in an area that has months on end of high humidity, you can try using a brush on or airbrush varnish. Vallejo matte varnish is formulated for airbrushing. However I’ve thinned it out and used is as a brush on varnish too. It will give your figures a slightly glossy look if applying by brush but provides a good protective coat.
That concludes my painting tutorial series. It’s an enjoyable hobby. While it might be daunting when starting out, if you stick with some key techniques you can produce some nicely painted figures. Just an even application of base coats, a wash, and highlights, you can get several miniatures done that can certainly rise up to tabletop standard. So don’t let painting anxiety keep you shackled to pushing around unpainted plastic. Get cracking and spend some time at the paint bench!

Painting Miniatures: Bases
So we’re pretty much getting into the home stretch of this series. Last week I talked some more on highlights. This week I want provide some tips on the final part of your miniature paint job, the base. Flat out you need to give your miniature bases some attention. It can be quite jarring to do a fantastic paint job on a mini only to have it sitting on a flat piece of plastic covered in green paint.
Your main tool with sprucing up your base will be PVA glue (aka white craft glue or Elmer’s glue). Adding a good amount of water you want to thin out the glue to a consistency of milk. You can add some sand to this to give it more texture. Then carefully paint the glue-sand mixture onto your base.
Once dried, give the model base a simple coat of paint and then drybrush with a lighter color. The small bits of sand will have enough of a rough surface to gather up the lighter highlights. This can work well if you want to mimic asphalt or concrete. If your base has a lip, I suggest only focusing on the top surface. You can add texture to the sides but wear and tear from handling miniature will commonly result in material getting rubbed off some.
If you want rougher texture, the base can get a coat of watered down glue and then dip the model into a small jar of sand. Gently tap the bottom of the figure to remove any excess and set it aside to dry. The sand texture can be painted over and then drybrushed. This works well if you want to mimic grass and rough ground.
Personally I bypass the dipping in sand and go the route of using flock. Flock is a railroad modeling material which mimics vegetation and comes in a variety of colors and textures. I paint the base with a solid color. Then I give the surface a coat of watered down PVA glue. Finally I carefully set the figure in a container of flock. Tap off the excess, let the glued on flock dry, and you are good to go.

Eventually you will be giving your model some varnish which seals the flock even more, but in general once the glue dries it’ll be pretty set. Note that the flock will rub off if you run your fingers over the surface. But the glue will give a good adhesive base to the flock. With normal gaming wear and tear, I’ve done this with figures and had flock stay on my mini bases for decades.
If you want an even more textured surface, you can use railroad modelling talus. This is a clay material with rough edges. It can work great representing rough ground and rocks. I usually add some to my flock to represent the odd stone or two. Like with flock you can set it using watered down PVA glue. Be mindful though that it’s a little more prone to rubbing off.

If you want a more solid bond, you can add drops of superglue to the talus. As the material is clay and porous, it will draw up much of the glue. You may get some pooling and a little bit of a sheen to the base. However the stuff once dried will be rock solid. You can even paint over the material and drybrush to represent grass or other rough ground.

Painting Miniatures: Drybrush and Highlights
The previous post I talked some on washes and shading. I’d like to move on discussing a tad more about drybrushing and highlights. Drybrushing is a subtle technique. To use it best, you want to be patient and work on multiple layers of lighter and lighter colors. It can be a time consuming process but eventually you’ll get wonderful results adding a tremendous depth to your miniature.
I suggest when adding highlights to work with a strong lamp or paint in copious amounts of natural daylight. You want to use the light and how it catches details on the figure to select areas to highlight. Those parts that capture the natural shadows and deep recesses you want to skip, and instead identify the edges of the mini that hold the light. When you touch those areas with a lighter shade of color over your basecoat, they will dramatically emphasize these raised parts, adding more contrast and give the miniature a more life-like look.
Even if using a drybrush as a base coat of sorts, you can use different shades to add more highlights. For chain armor, a fair technique would be to drybrush a metallic shade over base coat of black. But by using a brighter silver color on areas like the shoulders of a miniature, or edges of a sword, it’s possible to squeeze out more detail.
A slightly different take on drybrushing is something I call high contrast highlights. Here instead of dusting edges with paint, you add small lines of lighter color on edges of the figure. You are going for stark contrasts instead of a gradual layering. Unlike drybrushing, you want to do this before applying a wash. Shading after helps blend the colors some. It is a great tool for speed painting instead of traditional drybrushing and blending, but has some limits. In the pic below you can see the figure on the left has high contrast highlights, while the figure on the right doesn’t. Looking at parts like the legs you can see the armor standing out more compared to the figure on the right, where the color of the armor is more muted.
Another type of highlight which can add a fun look to your mini is Object Source Lighting (OSL). This is adding highlights of stark contrast colors to mimic light emitting from a source on the mini. Blending is pretty much a must here. Pick a part on the figure that you picture emitting light, then add the lightest color to that area. Raised edges and other areas on the figure that you think would catch that light source will have darker shades of that same color. Avoiding deep recesses, you want to pick out the edges that would collect the imagined light and use a darker tint compared to the one used for your ‘source’ of light. In the undertaker figure below, you can see how this high contrast highlight is used to create an OSL-like effect from the lantern.

OSL is something you want to use sparingly, but for some details like glow effects on weapons or ship engines. It’s a fantastic little effect that can add so much to a mini. Next post I’ll cover the final step to your paint job, miniature bases!
Painting Miniatures: Washes and Shading
I’m going to spend the next few posts adding a bit more to the 3 basic techniques I covered last time. I’d like to focus some more on washes and shading. If you want to quickly add something to a basic paint job to make your miniatures stand out, adding a wash will offer more than drybrushing. So if you wanted to add a little bling to your board game bits and didn’t want to throw in a ton of effort, a simple wash or quick shading will do wonders.
A basic means of making a wash is to add water to a paint thinning it down. You are going for a consistency of paint that is very fluid like water. This will add just a tinge of color to upper edges but allow more pigment to pool in the recesses and deeper details. This is a pretty simple means to make your own wash, bypassing the need of purchasing dedicated washes.
I first have to offer an excellent overview of shades, inks, and washes by Dr. Faust’s Painting Clinic. He covers one issue that can creep up sometimes when doing washes, especially if just using thinned down paints. Occasionally you can get an uneven layering of color due to pigment depositing higher up on miniature details as the wash dries. This usually crops up in smoother transitions of detail like tunic smocks and cloaks. It also is more common when covering lighter base colors with dark shades of brown and black.
One way to get around this is creating your own special wash mixture of Wet Water. Use about a drop of soap per 1-4 ounces of water in an empty bottle. This results in a solution with reduced surface tension, allowing for more uniform mixes of wash. Be sure to add soap sparingly. Too much and you’ll get foaming. A tiny amount will provide just the right amount of surfactant needed. Using this to mix on a palette in place of regular water, you end up with a wash that has a more uniform flow of pigment.
If you are using a particular color repeatedly, you may want to consider making your own wash solution diluting with wet water. That way you can simply get your wash directly from the bottle. If you have a lot of figures to go through and want the most consistency, this is a good option. However you may want to consider looking into purchasing washes if you have a pile of figures you want to paint in a similar scheme.
Inks are similar to washes, except the pigment is more intense. They are excellent if wanting to impart more color to your shading, particularly for brighter colors. Like with paint washes, you want to dilute out inks quite a bit as even diluted they can provide a lot of color. Glazes can be used for shading but work more for blending colors. Glazes are a great means to add subtle transitions of color like folds of cloth on a miniature. One thing about inks, you might end up getting a gloss shine to a figure. Don’t panic. If you are following through all the steps of miniature painting, using a matte varnish to seal the figure will cut down any glossiness from ink washes.
A good technique for working with washes is to use different colors for sections of your figure. Using different color washes can bring out a great amount of detail to add some intensity to parts of a model. However single washes with neutral tones can provide a fairly easy means to add shading to a mini.
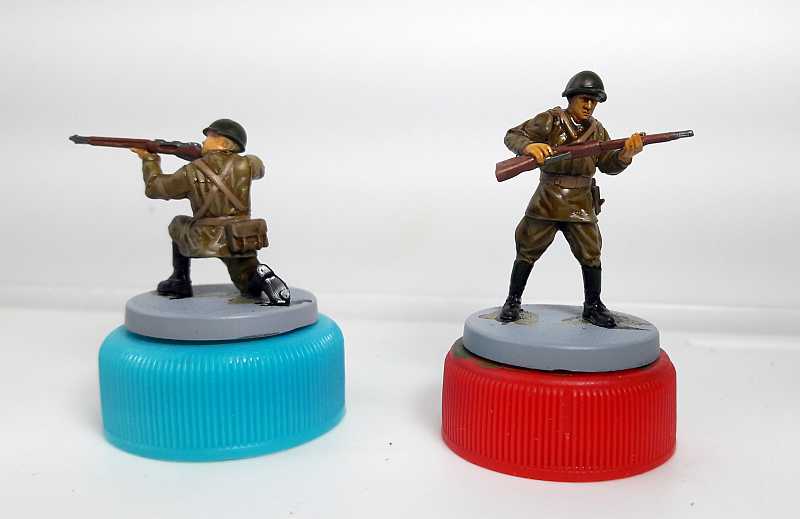
I highly recommend getting some Sepia Ink for miniature painting. This is a fairly neutral shade that you can use as an entire wash for a miniature. For flesh tones this can add a good amount of color to faces and still work well for clothing. You can see with some 28mm Russians below, just a single wash of sepia ink can bring out details on faces and add some shadow to tunics and clothing. Instead of working with various brown and green washes for these figures, a single wash of this neutral brown works well enough.
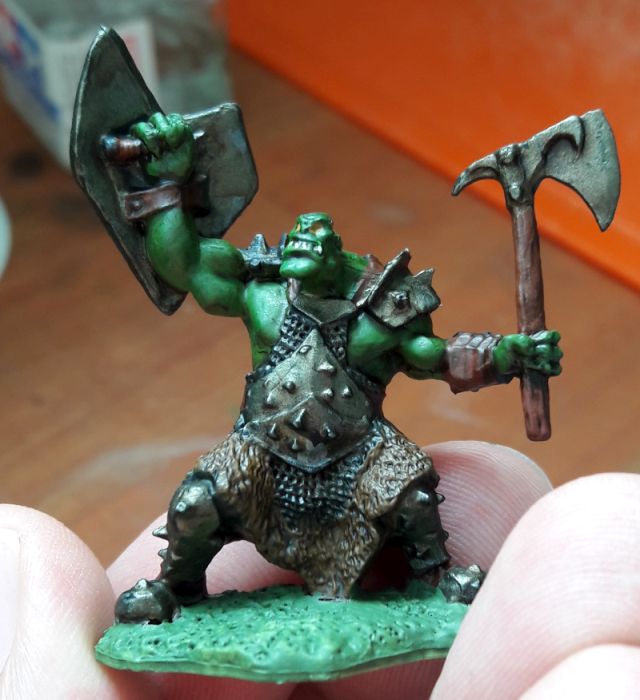
Be mindful though this can sometimes mute your colors too much. You can see with the orc below that a sepia ink wash certainly imparts a dingy look to the figure. However it also lessens the transitions of color like from the skin to layers of the figure’s clothing. Sometimes this is an effect you want to go for. But if looking to emphasize portions of a miniature, you have to put extra effort into blending and highlighting those parts when working with a single wash.
[EDIT: So Games Workshop has introduced Contrast Paints which look like an interesting product. They might replace the need for washes entirely. For new painters or people looking to get a slew of minis painted to tabletop standard, these paints might be worth a look.]
Painting Miniatures: The 3 basic techniques
We talked some about using paints and tools to have at your bench to help with painting, but now I’d like to go over specific painting techniques. I call these the big 3, three main techniques that can be used to create nice looking figures. If you can get some technical proficiency using these painting skills, your miniatures will look great on the tabletop. These panting skills are (1) the base coat, (2) washes, and (3) drybrushing.
Briefly, the base coat is just what you’d think, adding a foundation color to parts of your miniature. Drybrushing is a technique to bring out the highlights of the model. And finally washes help bring out details of the figure, adding some depth to areas. Combined, these 3 techniques can make a ho hum paint job with just base colors get some real zing.
You will first be applying a base coat to the miniature (or sections of it). A good process to follow is consider working details from the inside out on the model. That is, start with the ‘naked skin’ and work out to layers of clothing/armor, moving on to details like webbing, belts, boots, and finally other accessories like weapons, jewelry, or other small details.
This can vary from miniature to miniature but it’s not a bad process to start with. The key point is to focus on applying a single base color to a particular part of the figure before moving onto other sections. You don’t want to paint the face, then the leather vest, then go back to painting the skin on the arms of a figure. You want to get the face and all the naked skin first, then move onto other areas of the mini. Work on having a clean transition from one part of the mini to the next. If you make a mistake and paint one color over onto another part, you can go back later and give a touch up if needed.
When adding a base coat work with thinned paints and apply multiple coats. If the paint is too thick, you can leave brush strokes (uneven coats of paint with lines from the bristles). It is also quite possible to have paint obscure details if applied too heavy, where it pools up in areas. So thin out your paints and go for 2-3 coats if needed. If your paints have about the flow and viscosity of milk, you should be fine and maybe (depending on the paint) even be able to get away with a single coat. You can see with the Reaper Bones miniature below I’ve applied a green base coat to the cloak.

As I mentioned earlier, have two containers of water. One for cleaning, the other for washing your brush. Periodically be sure to clean most of the paint from the brush. After about 10 minutes or so while painting, you might actually have paint on the bristles dry. So a brisk cleaning in water once in a while will avoid this. Also if working with metallic paints you want one small dedicated wash jar. This will reduce the chance of metallic flakes getting into your other paints.
For the other two techniques I will go into them in more detail in future posts. A wash is a thinned coat of paint or ink. This might alter the base coat hue some, but it is really to add shade and darken areas that have details. This can help bring out parts of a figure’s face or accentuate fine lines on the mini. Washes pool and create shadows of deeper color. If you are making your own wash from a paint color, you want to add more water to really thin out the paint.
Commonly you want to use a darker shade of your base color. It’s also possible to go with a neutral color depending on the effect you want to go for. In the photo below I’ve really added water to thin out a darker green color paint. It has altered the base coat some, but you will notice that it really pools in the recesses of the cloak and brings out the cloak embroidered edge.

You can go overboard however and have some areas that might get too much of your wash as gravity sets in. After applying a wash, use the same brush and tap it on a paper towel, allowing the liquid to be drawn away from the bristles. Then use the brush in areas that have pooled up too much wash, and through capillary action the excess will be sucked into the paintbrush. Simply dab the bristles on a clean section of paper towel and repeat. You will leave plenty of wash behind and still be able to get that shading effect you are looking for.
Drybrushing is the opposite of washes. Where applying a wash brings out the shadows and dark lines of the miniature, drybrushing highlights the raised parts of the figure. This is a little more technique driven. You want to use an older brush, or possibly a flat brush, and get paint on the tip of the bristles. Then gently stroke the brush on a paper towel or other clean surface (like the back of your hand) to remove most of the paint. Eventually you will have a trace amount which you can lightly bring across the edges of a figure, dusting it with color.
Use a brighter color compared to your base coat. Work on areas that you expect to catch the light. Like for a cloak, the folds would be dark, while areas that would billow would be much lighter. Be patient. Unlike washes which can give an immediate result, drybrushing is slow to develop. Go lightly and build up areas slowly. Note that this is a technique that works best on edges and parts of a miniature that have intricate details.
The cloak I am working with can be difficult as larger areas can be hard to apply effective highlights, unlike the sharp edges of the cloak and crisp folds. It’s a subtle technique (and likely may not photograph well with a crappy phone camera) but you can just make out some of the upper folds having a lighter tint. Obviously the lighter shade of color compared to the base coat, the more dramatic the effect.

I would be remiss to not mention blending. I consider this a more advanced technique. With blending you are working with a dark shade and adding lighter colors to gradually blend the hue into a brighter color. The idea is to give a uniform base color, and as you move up towards areas that are raised, the color increases in brightness. This is especially good on large, smooth surfaces or rounded edges. In particular 40K space marines have shoulder pads, legs, and arms that don’t have a lot of detail and are curved which don’t highlight well. So blending is a way to give the models some life and make them pop.
Don’t worry about adding blending to your painting repertoire initially (or at all). A good base coat, wash, and drybrush will give your figures a lot of pizzazz and are powerful techniques. Combined they add depth to your miniature. The can be tweaked and altered to really bring out details on a figure. Using these techniques can also allow you to do some interesting things for your model.
I like to highlight a quick tutorial from Sonic Sledgehammer. This chap gives a great example of all 3 techniques being used to add a pleasant weapon glow effect. He also demonstrates how washes can alter the look of a base coat if used appropriately. Watching this brief clip you can see how all three can improve your results, just by applying these basic painting skills.
[EDIT: So different manufacturers have introduced Contrast Paints which look like an interesting product. They might replace the need for washes entirely. For new painters or people looking to get a slew of minis painted to tabletop standard, these paints might be worth a look.]
Painting Miniatures: Working with paints
You’ve got your brushes and are eager to get a coat of paint on those primed miniatures. This week I’ll be covering some tips on working with paints. So first off, what paints should you buy and use?
Older hobby modellers were pretty much stuck with enamel paints. They provide a good coat of paint, especially bright colors. More importantly for some model kits (RC cars and the like), they can handle wear and tear well. However I would not buy enamel paints. Mixing colors can be a challenge. Cleaning brushes requires paint thinner solvent. In general they are a pain in the ass to work with.

Fortunately you have an alternative, water based acrylics. Over the years the formulation of these paints have improved and honestly I don’t see any reason not to use them for miniature painting. Simple to mix colors, dilute, and clean up, they are so much easier to use compared to enamel paints. You can look through other resources to choose manufacturers or brands. In general though, I would avoid using big bottle craft acrylics for miniatures. They can work for applying a single color base coat, but commonly I’ve found they don’t hold a uniform pigment, don’t dilute well, and blending or mixing colors and can be problematic. While they are great for other modelling projects like terrain, I’d steer away from brands like Apple Barrel craft paints for miniature painting.
How many colors are enough? That is difficult to address easily. At the very least I would go for the 6 primary and secondary colors in a color wheel (blue, green, yellow, orange, red, violet) and add white and black to your list. Then I would have at least 2 shades or tints of each color. So at the least have a dark green and a light green for your ‘green’ paints.
If you can go all out with paints, I would have 3 of each color. One would be your base color, while the darker hue is used for washes/shading and the lighter color for highlights. Even with at least 2 tints of each color, you can use one for either shading and/or highlights. I would certainly purchase some gray colors too. In addition to this consider buying some dedicated paint colors depending on the miniatures you are painting. If doing a lot of fantasy models, you will have lots of leather and wooden hafts, so additional browns of various hues would be good. I would also buy some metallic colors for armor, metal helmets, shields, and the like. This will allow you to have some ‘go to’ colors if painting lots of particular model features like swords or leather boots.
Even if sticking with paint colors directly from the jar, you will want a working paint palette. This does not have to be fancy. It can be an old ceramic plate or piece of plastic. I’ve even used a plastic lid from a spreadable butter or cream cheese container before. In general you want a surface that is white and not porous. It should clean up easily with water and a paper towel, and be white so it’ll not throw off the shade of your color mixes.
Give your paints a good shake before opening them. I cut old plastic sprues into small chunks and add them directly to the paint jar for water based acrylics. Even dropper tips can have the top gently pulled off so you can add it into a bottle. The piece of plastic works similar to a spray can paint ball, increasing the efficiency of mixing as you shake it. Some brands like Reaper paints already have mixing beads in their pots.

A few paint manufacturers have dropper tips for their bottles. Using a palette, you want to mix some water with the drops of paint, working it into a milk-like consistency. You can always add either a drop of paint or clean water to get the desired mix. It’s better for the paint to be somewhat thin than too thick.
If you are working with paints in a jar, avoid sticking your brush into the pot directly. Get paint on your brush using the lid of the container instead. This way you avoid dipping your brush too far into the paint jar and possibly getting paint in the ferrule (metal part that holds the bristles). Even if using a palette, you want to be sure you are just placing the tip of the brush in the paint. Slathering on too much paint by sweeping the entire brush onto the palette can also work paint into the ferrule. This needs to be avoided as it can be hard to clean and when the paint dries it will force the bristles apart, deforming the shape of your brush.
If you paint in spurts (I’m a huge fan of the 15 minute paint day) or mix colors a lot, you may seriously want to consider investing in a wet palette. It’s actually a pretty easy thing to make yourself with parchment paper. The advantage of wet palettes is those mixed colors can be used for longer periods of time, getting more consistency over several models. This is especially useful if you are working in short bursts of painting activity. By not having to constantly clean your work palette, you can easily get back into continuing a project.
One last tip, also have some index cards handy and keep track of the paints used for figures. If you do a lot of rank and file miniatures this is especially helpful. Eventually you may add another unit to your force and trying to remember that exact mix of paint for a base coat, or what wash you used can be hard to recall after painting other figures (or in my case trying to remember a year plus later).
Painting Miniatures: Brushes
Just a short post this week to touch on brushes. You’ve got your mini set on a handling base and eager to get to it. Now you are considering what brushes to have at your bench to start painting. I’m sure you can dig up tons of information on brushes elsewhere. I just want to focus on a few points regarding them.
You only need 3 brushes and I consider a fourth a good buy but not necessary when starting out. You want to invest in 3 round brushes, and possibly a single flat (or a filbert) one. I would buy a 3O (OOO), an O, and a number 2 or 3 round brush. The No. 3 brush is good for adding base coats to sections of a miniature, while the O and 3O are good for finer details. A flat/filbert brush that is about ¼” is a good size brush to also consider picking up. The flat brush is good for painting larger areas and also great for drybrushing (a technique I’ll bring up in a later post).
As for bristle types I am a fan of hair or mixed brushes. I don’t particularly care for synthetic or nylon bristles. I find the nylon brushes are a cheap buy and do keep their shape, but they just don’t hold paint as well as natural bristle brushes. Some folks swear by them however.
As to actually using them with paint, that is a topic I’ll cover more later. Just remember you should be using the tip of the brush to apply the paint. Avoid stroking on paint working from the side of the brush to the point. Let the brush do the work and use the tip instead. I do want to cover some points on cleaning and maintaining your brushes though.
For your fine round brushes, they should come with a protective sleeve that goes over the brush point. Keep this cover. While you have your brushes stored, they should be covered using the sleeve. This will help protect the bristles and avoid them losing shape by accidental handling.
I keep 2 containers of water at my bench. One for diluting paint and is ‘clean’ water while the other I use for cleaning my brush. If working with metallic paints you might want a third dedicated water container. This can avoid getting reflective specks in other colors you prepare. When cleaning your brush, don’t mash it down on the bottom of your water cup or jar. If you have paint that can’t dislodge by shaking the brush in the water, stroke the bristles on the side of the water jar in an upwards direction. This will avoid deforming the bristles and work any paint away from the ferrule (metal part that holds the bristles) towards the tip of the brush. You can also always do a final rinse of your brushes under a running tap.
After you clean your brush and are done with painting, gently reform the point if needed with moist fingers and cover the bristles in its protective sleeve. Then leave the brush on its side for several hours (or overnight), finally moving it to be stored bristle-side up. By allowing the brush to dry on its side, any moisture still on the bristles will stay out of the ferrule. Even if the brush is clean, by drying with the point up, moisture carrying a small amount of paint will fall into the ferrule by gravity. Over time that paint will accumulate and begin to force the bristles apart, deforming the shape of the brush.
Periodically you may want to clean your brushes with a soap solution. It’s a small investment but I highly recommend picking up some Original B&J “The Masters” Brush Cleaner & Preserver. It’s a soap that you use with water and is an excellent way to clean your brushes.
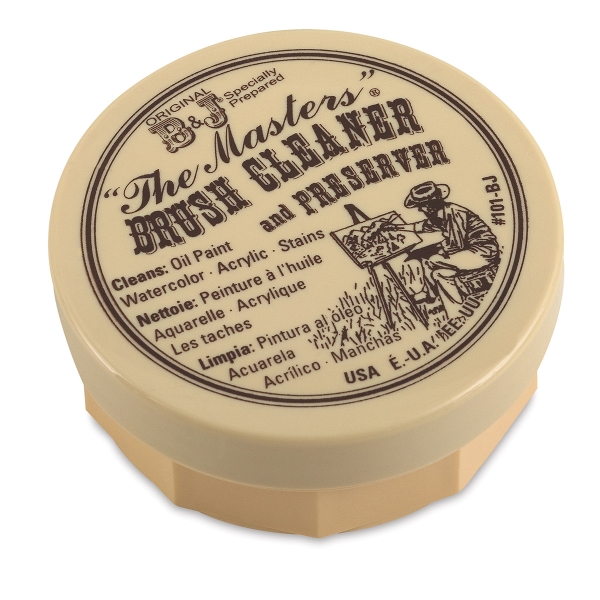
About once a month you can wash the brush with the soap and a little water, working up a foam. Remove the foam on a clean surface like a paper towel and repeat the process a few times, ending with a final rinse with water. You can even add a small amount of soap to the tip of the brush, gently making a point with your fingers. It’s a great product that does wonders for cleaning your brushes and can add years to their lifetime.
You might still need to give your brushes a more thorough cleaning. One trick is to store the brush in solvent upside down. By poking a hole into cardboard, and carefully working the tip of the brush through the hole, you can have the handle stay stuck in the cardboard relatively securely. Then the brush can be placed in a cup or glass bottle with the bristles being allowed to soak freely in solvent. Set overnight this can help remove excess paint in the ferrule and can possibly help restore brushes that lose their point.

This is usually a last resort method though. If you follow the previous tips, you can stretch out the lifetime of your brushes by years. Just a little bit of preventive cleaning and proper maintaining of your brushes can go a long way keeping them in top shape.
