Category: Miniatures
Painting Marvel Crisis Protocol – She-Hulk
I’m going the route of fun characters for my Avengers list. The superhero lawyer, Jennifer Walters, aka She-Hulk, was a model I wanted. Sadly, seems the group think around She-Hulk is she’s underpowered for a 6 threat. However I love the character and certainly wanted a high threat roster member for those upper limit crisis missions, so She-Hulk was going to be part of my team.
As most of my MCP stuff, I’ve been leaning heavily into Vallejo Xpress contrast paints and using their acrylics too. With a slapchop base of grey primer, drybrushed white, I worked on sections of the jumper using Gloomy Violet Xpress.

I then gave Jennifer Walters a base of Troll Green Xpress which really provided a wonderful look.
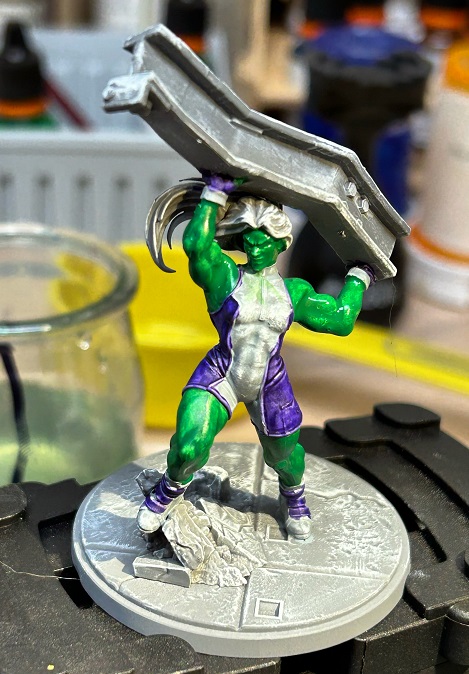
Her jumper was a little tricky. I first gave a pass with Templar White Xpress, and then followed up with a thinned Sky Grey. The creases and folds in her jumper I defined further with did a 1:1 of Sky Grey/Pale Grey Blue. For her hair I used a 1:1 mix of Lizard Green/Black Lotus Xpress
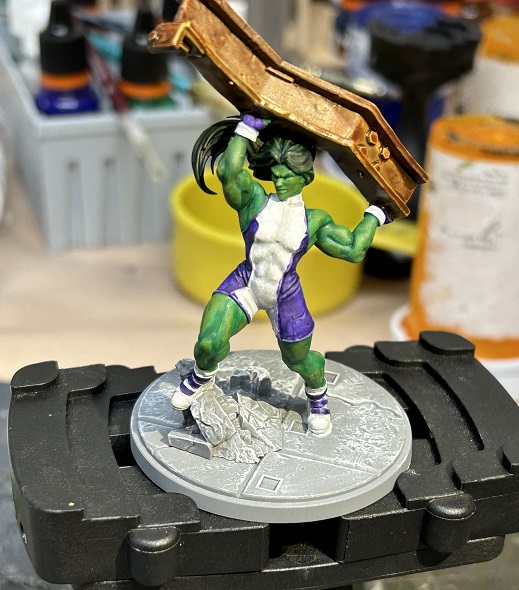
I put some more attention on the girder and went with a base coat of Copper Brown Xpress.

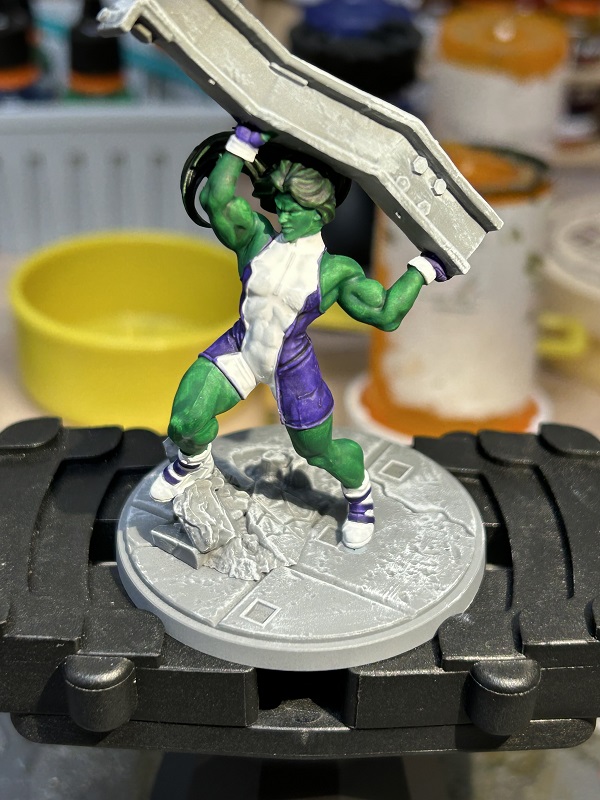
I did a final pass over her jumper with White. I thinned it some and dappled it on with a coarse brush.

For She-Hulk’s skin I worked in highlights using a mix of 1:1 Troll Green Xpress/Uniform Green. I shifted to a final highlight of sections just using Uniform Green acrylic paint.
The final bits were using various paints I have to touch up sections of her base. I used some orange colors to add a rust effect to the girder. I also used a red brick color to some of the base to provide a little contrast. I finally used a thin wash of sepia ink on some base sections and GW Ratling Grime contrast for other parts of the base.
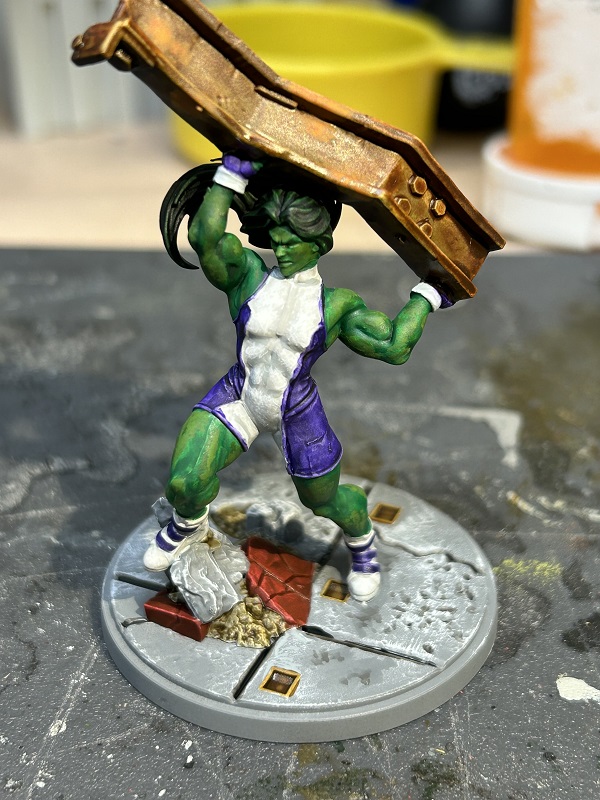
Overall I really liked the look I got for She-Hulk. I forgot the cardinal sin of painting white being you basically use every other color for a base coats, washes, and shading other than actual white. Instead, best to use white as that final drybrush for highlights. But in the end, I think she looks pretty good and ready to smash up baddies for my next MCP game.
Painting Marvel Crisis Protocol – Luke Cage
Like probably every other MCP person out there, I’m working on filling out my Avengers roster. But I wanted to get some folks that could do double duty and work with a Defenders list. I have a soft spot for Daredevil and the street level heroes, so thought Luke Cage, aka Power Man, would be a good choice.
Going with Vallejo Xpress contrasts and paints, I put a base slapchop coat down using a gray primer and white drybrush. For the jeans I put down a coat of Storm Blue Xpress. Quite honestly, I just left it with a single coat. The coverage looked great giving the mini a faded jeans look.

For his shirt, I put down a coat of Imperial Yellow Xpress, then a coat of Deep Yellow paint. I still wanted a deeper tone, so I gave the shirt a final wash of Amarillo ink.


To give the shirt a little depth, I used a 1:1 mix of Transparent Yellow and Deep Yellow. I then put down some final highlights of Deep Yellow.

Luke’s skin got a base coat of Smoke. It’s a really dark brown that I love. For the belt and bracers, I departed some from the classic comic look and went with Beige for a leather look. The skin, bracers, and belt got a final wash of thinned Army Painter Strong Tone.

I painted his boots Black and gave his skin some soft highlights of Beige. With that, the model was done.

I deviated a little with only Vallejo paints, using some GW contrast paints for the girder and cement cracks. Also looking at a lot of the previous pics, you might get the impression the skin is too shiny. And if using inks and certain washes that can also give minis too much of a shine. However I wanted to demonstrate how well a good coat of matte varnish helps. Just a single coat and it completely softens the paint job, ending up with a great look. Sweet Christmas, I can’t wait to get him on the table.

Jumped into the YouTube Pool
Welp, decided to go with the rising tide of streaming and videos. Enjoy blogging and still think I’ll be putting up written reviews for things that strike my gaming fancy. But I can’t deny that the days of the written blog are waning. I still enjoy making gaming content and likely focus more on documenting my bench and tabletop time with videos going forward. My first effort is linked below.
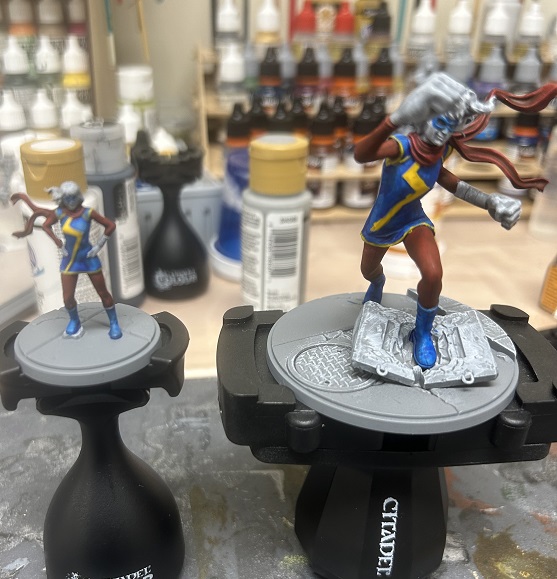
Painting Marvel Crisis Protocol – Ms Marvel
Continuing my painting efforts to finish an Avengers roster, I veered towards doing fun stuff and worked on Ms Marvel. I love the character and for any comic nerds, highly recommend checking the title out. If you want a lighter superhero book that’s just fun, Ms Marvel has got it in spades.
As I’ve mentioned before working with contrasts, I’ve leaned heavily into the Slapchop method. For Vallejo Xpress contrasts I’ve found you can get away with just a white drybrush over gray primer.

I stuck with Vallejo paints all throughout. For her uniform tunic I went with Xpress Mystic Blue and her sleeves, leggings, and scarf Xpress Velvet red. Especially for the Velvet Red, I just love the deep tones you get as shading right from the pot.

I highlighted her uniform with 1:1 with Vallejo’s Xpress Mystic Blue/Ultra Marine, and a 1:1 Xpress Velvet Red/Carmine Red. The uniform piping and lightning bolt I gave a base coat of Desert Yellow and then a coat of Transparent Yellow to brighten it up some.
For her skin, I put down a base of Beige Brown. I used Gold for her bracelet. It’s a little bright but figured once I got a wash down, it would darken niceley.

After the base skin parts were painted I then gave her a sepia ink wash, including her bracelet. As final skin highlights, I used Orange Brown. For her hair I used Smoke and highlighted it with Beige Brown.
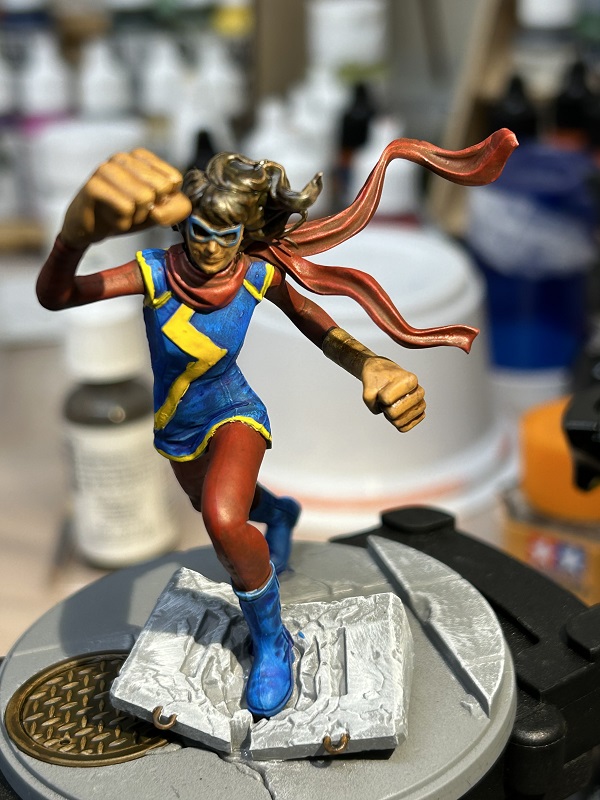
The last bits were for the base. Just some copious drybrushing for the concrete barrier and curb. I gave the manhole cover a quick cover of contrast paint and called it done. Gonna be fun to see her on the tabletop.

Toy Truck Terrain for Marvel Crisis Protocol
Walking around my local Target I saw some toy trucks that grabbed my eye. Battat Toys has the Driven Micro Fleet line that seemed the perfect scale for MCP. I snagged a box for about $20 USD and eagerly took it home to figure out how well they’d match up with my minis. I was happy to say they look pretty good.

There seems to be a few choices with one set being a road roller, truck, and platform crane. While another had a tow truck (with car), dump truck, and forklift truck. I wanted something to fit for some construction terrain I was working on, so I picked up a box with a dump truck, backhoe loader, and crane.

I took a few pics with a MCP car to give a comparative scale. Overall I think they look good with the truck and crane about size 4. The backhoe loader was maybe closer to size 3. Unfortunately the truck trailer section is open. I might think about having a removable debris pile so minis can properly plop on top of it.


The trucks have moveable parts which I’m going to have to glue together and/or shut. I’ll likely have to give it a good matte coat of varnish before trying to paint them too. Not going to try and give them a complete new coat of paint, but rather work on weathering up the trucks to make them look a little better on the tabletop. Regardless for 3 trucks a set and a steal of a price, a good purchase if wanting some options for beefy vehicles to add to your MCP terrain.
Terrain for Marvel Crisis Protocol – Atomic Laser Cut Designs
I’ve got a chunk of modern terrain for Zona Alfa and the core box for MCP has a slew of nice terrain, still I wanted to get a few options for terrain pieces. I stumbled across Atomic Laser Cut Designs looking mostly for my Zona Alfa and Country Road Z boards, but some of their modern building sets looked like they would also work for MCP.
I picked up a small, generic, single story shop from Amazon. The kit is flat packed. It is pretty simple to assemble with well cut holes and notches that easily fit together.

The building comes with a front and side door along with protruding window frames. I think it would be very easy to use cardboard to fill in open spaces if needed. The doors have an interesting design that allows the door to be removed or shifted open. With a small amount of Blu Tack you could keep the door secure and prop it open while playing. The roof section can easily be removed and sits securely using tabbed notches in the walls.
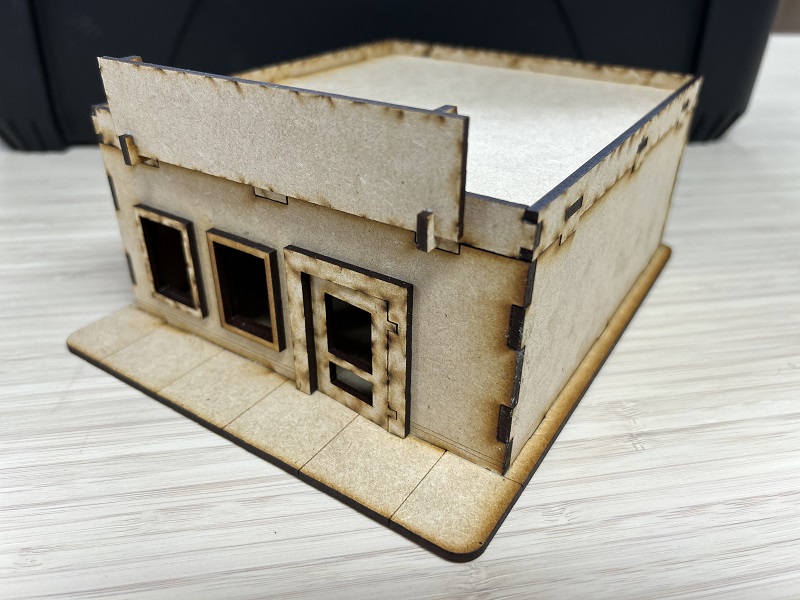


The storefront sign is nice allowing it to be removed and clips onto the roof easily. I’m already thinking of some simple designs to print out and mount with Blu Tack to reflect different games I could use it for. Possibly make it “Joe’s Guns and Ammo” for zombie games, to “Cosmic Comics” for MCP games.

As a size scale it’s a little harder to nail down. For 28mm it certainly hits that look of a single story building. You can see it’s larger than a MCP kiosk but I feel strictly height-wise would straddle between size 3 and 4. However looking at some other official MCP size 4 buildings, and given the overall footprint on the table, size 4 seems appropriate.

My complaints for this kit would be that the walls are pretty sparse on details. Also the roof fits great but the notches might be too glaring. You’d have to incorporate some paint scheme to work with the roof. Note there are other building sets in their modern terrain line that have more detail like distressed walls. In general the kits are for the Walking Dead miniature wargame and seem to match that setting and scale well. However, I wouldn’t get too wrapped up in their product line names. The “mean streets” sets have nice looking brick buildings and the 3 story one looks particularly good. It seems quite high and doesn’t appear to take up that much table space for a size 5 terrain piece.
Marvel Crisis Protocol – Miniature Storage and Carrying Case
Been loving Marvel Crisis Protocol but one thing that stood out for me is how some of the figures are just downright fragile. I typically keep my figures in cases of foam and/or bubble wrap, but minis like Daredevil have parts that would snap off easily. I needed to find a different way to store and transport my painted models. I ended up making my own, using an old toolbox case. It was deep enough to hold several models and possibly hold another tier if I could work out a way to mount something over the box chamber.
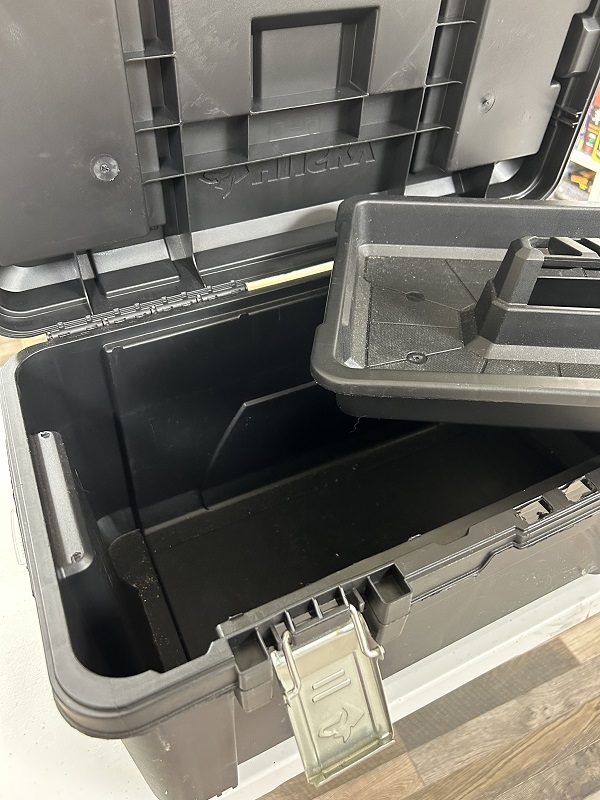
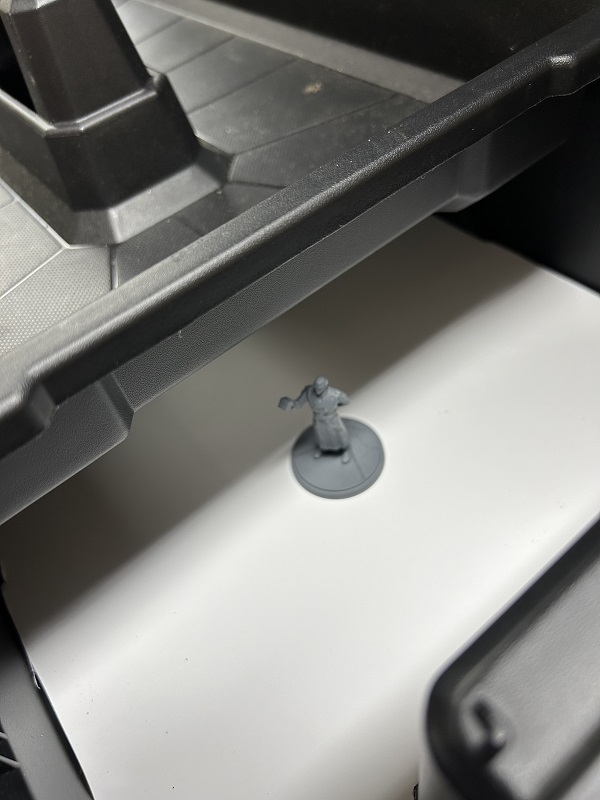
Some of my minis were a little wobbly, so I used metal washers to add weight to the base. They were also ferric enough to allow a magnet to stick to them. Using thin magnet sheets, I could easily cut out sections that would fit snugly under a miniature. An important bit, make sure to buy magnetic sheets that are thick (2 mm or so). You can get thinner magnetic sheets but they won’t be strong enough to stick to your washers.


I used a paint pen to outline sections of the case bottom for minis. This would help me get a better layout of the available space I’d have for miniatures.

The toolbox I had was pretty deep. Enough so that I could add another layer for storing minis like I typically do with foam sheets. The trick was to figure out how to add a second section. Using a block of old styrofoam, I cut roughly 3cm thick sections off and mounted them in the corners with a hot glue gun. I figured it would be a better design to allow for the second tier to be pulled off in sections. So for the middle of the case I used longer portions of styrofoam that would act as supports. I mounted the magnetic sheets with superglue, not relying on just their adhesive backing.


Using thick foam board I could easily cut out snug fitting sections that would rest on the styrofoam supports. I also used a washer to outline parts I would cut out to help in their removal. A tip, make sure to add some feature to help keep the orientation of the foam board sections. Notice I cut small notches in either a side end (left) or along a long edge (top right) to help me easily determine which was left or right. This was especially important as the toolbox interior wasn’t straight edges and I had to cut out odd sections of my foam board to make them fit. If I got pieces flipped around, I’d have to constantly re-seat them to line up properly.

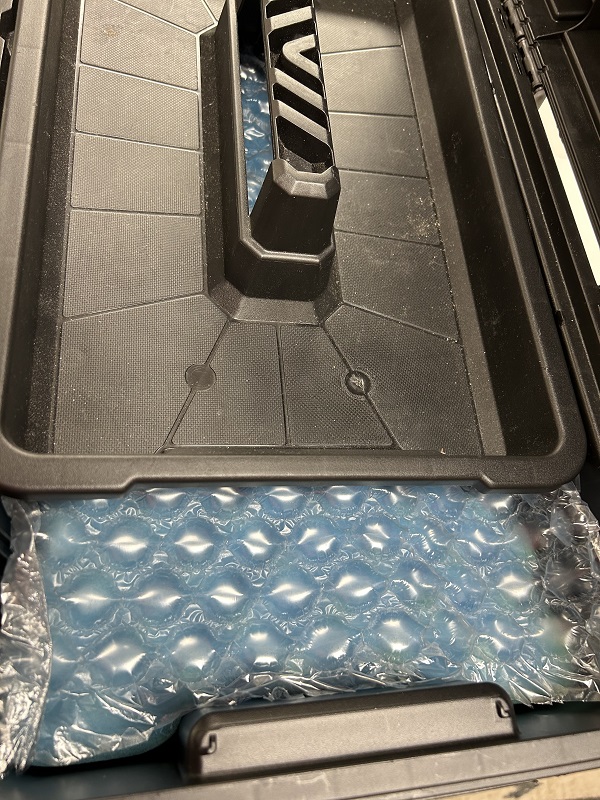
The sections were well deep enough to let me lay down a bed of foam. I had some nice thick sheets of bubble wrap that would provide adequate protection once the lid was closed.

As a bonus, my toolbox had a tray that fit just under the lid. This worked out great for me as a way to help keep the foam and bubble wrap sections snug. Plus it could hold range and movement tools in transit. As another plus, I could use it as a model tray to move my roster minis around during a tourney, without having to pack everything up in the case again. Mind you, the magnets won’t keep your figures from shifting around if you shake the box, but as you can see the magnets are strong enough to hold the minis in place at a steep angle (like on its side as pictured).

Painting Marvel Crisis Protocol – Daredevil
Continuing my efforts in completing a pile of unpainted plastic, I took a stab at Daredevil. This time I completely embraced using Xpress contrast paints by pretty much using them for most of the uniform. I love the dark hue of Vallejo Xpress Velvet Red and think it pretty much gave a great look to his costume just using a single coat.

To make Daredevil’s chest symbol and baton webbing stand out more, I put down a coat of Vallejo Red. For his skin, I used a coat of Vallejo Dark Flesh.

The baton cable I put down a coat of Xpress Templar White, and painted some of the underside sections with Vallejo Basalt Grey.

For some final touches, I gave the skin on his face an Army Painter Strong Tone wash. I also mixed a 1:1 of Xpress Velvet Red and Vallejo Red to paint the underside of the baton he was holding, along with some parts of this thigh webbing. As a last touch, I dabbled in using GW contrasts, using Ratling Grime to give the tombstone and sections of the base some detail. I also went over underside sections of the baton cable with that dark contrast, to add just a little more to it.

The final result isn’t going to win any painting awards. It’s a pretty slapdash job. But oddly I think it just works for Daredevil. Despite the name, he never felt a flashy character and the muted, basic look to me fits with him being a street level hero, keeping Hell’s Kitchen safe. Good enough for the tabletop I think.
Painting Marvel Crisis Protocol – Black Widow
Continuing my painting exploits, I’m just about done with the core set and moving on to some other models. Yet, I’ve still got a few Avengers on the bench and Black Widow was next in the queue. As with much of my other models, I’ve really come to embrace Vallejo Xpress contrasts and started off giving her 2 coats of Black Lotus Xpress for a really dark jumpsuit look as one coat just didn’t seem to get as dark as I wanted (pic is with one coat).

For her webbing, bracers and belt, I put down a base coat of Desert Yellow. As a final touch for her belt and bracers, I mixed metallic Gold with sepia ink and used it as a wash for these sections of the model.
Her skin was a coat of Basic Skin Tone, and for Black Widow’s hair and eyebrows, I used Plasma Red Xpress.

I gave highlights in her hair a single pass of Amaranth Red. Then have both her skin and hair a wash of sepia ink. For the webbing I used a coat of transparent Yellow, and a final highlight of Deep Yellow. I went back and forth considering adding lipstick. Typically I’d add it to the lower lip only, but it was difficult to get it down just right, so I ended up just sticking with a natural skin tone.

I used Dark Blue Grey for the pistol grip and highlights for her jumpsuit. I first used a perspective of looking directly over the model and liberally coating portions of her jumpsuit that I could see. Then I edged it out some for these areas to break up the transition. This forced perspective allowed me to really key in parts of the figure that would naturally be lighter.

I used a generic red craft paint for the bricks on the base. Then a final coat of GW Ratling Grime contrast to pick out the details of the brick mortar and metal grill. Just a basic wash to give the base a little love and Black Widow was ready for the tabletop.

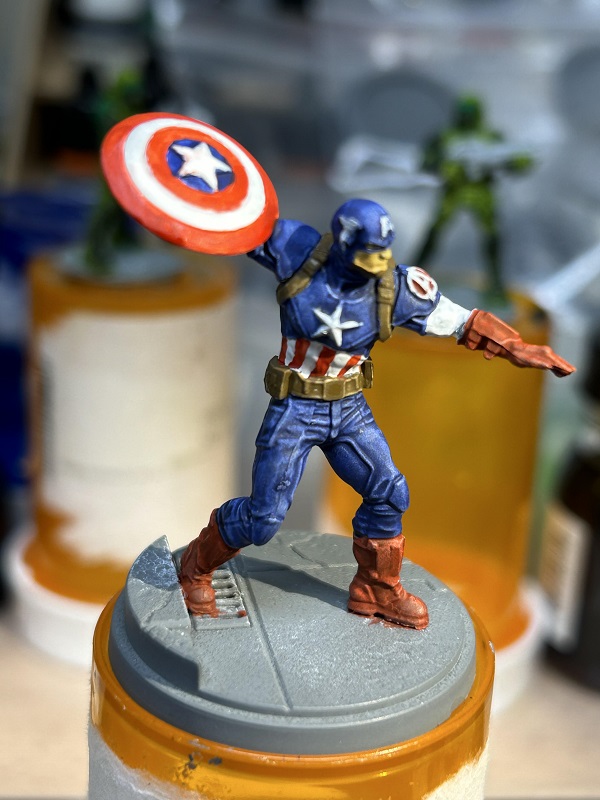
Painting Marvel Crisis Protocol – Captain America
Last time I detailed my paint scheme for Captain Marvel. This time I’m going to go over the other Captain in the Marvel Crisis Protocol core set, Captain America. Like the other models I painted I primarily used Vallejo Xpress contrast paints (with Vallejo acrylics on other portions). A slightly different approach over your typical slop chop method, I painted a base coat of white over parts of the model. Cap’s waist, biceps, and outward section of the shield were all given a coat of white.
For the red used on the mini, I used Xpress Plasma Red. His gloves and boots were over a gray base coat with a liberal drybrush of white. The piping of his waist and the shield simply had stripes of red painted on. With a different undercoat, the red for these sections really stood out more compared to Cap’s hands and feet. I did have to go over sections of the shield a few times to clean up the stripes. I imagine a more careful hand could have done this easily, but it took me a few tries.

For the center part of the shield and the rest of Captain America’s uniform, I used Xpress Storm Blue. Painting it unthinned, I think it really gave a wonderful look to the figure.

For his face I put down a base color of Dark Flesh. The chin strap, belt and webbing got a base coat of German Camo Medium, with the buckles having a base coat of Gunmetal Gray. The underside of the shield I used Neutral Gray for a base coat.
A final wash of Sepia Ink over the belt, underside of the shield, skin, and webbing was added for a little more depth. I also gave his uniform highlights of blue with Ultra Marine. And for his gloves and boots, an initial highlight of Carmine Red and White at 1:1, with a final coat of Plasma Red Xpress.

A little attention to the base and a final gloss varnish was applied to the shield to give it a slight reflective shine. Good enough for the tabletop. Might move onto Ms. Marvel next.

