Category: Miniatures
Paint scheme reference cards
 This week just a small tip for folks delving into miniature painting. If you are like me you might have a lot of different game systems and army projects going (sometimes several simultaneously). Once an army is done, going back to add a few troops or units is always an option. However it can be a tad difficult to remember what paints were used before for that force.
Another issue is that occasionally your miniatures will get some dings and dents. You may find needing to touch up a miniature or two. So trying to think back what paints you originally used for a base coat along with the proper wash might be a problem. It’s compounded if you’ve been painting a slew of other stuff since then too.
To get around this I use note cards. I write down the paints used for base coats, washes, and highlights. Additionally I pair this information up with the appropriate parts of the models. Along with the name of the paint, I also place a small dab of the paint color on the card.
This way I know exactly what colors I used for say, the webbing on my US Marines, along with the colors used for the drybrush highlight too. The color reference is also there in case I have problems tracking down a specific paint. I then have a hue to compare to if seeking a replacement paint from a different manufacturer. Another plus is I can take the card with me into the shop to directly compare.
They are very handy. I’ve got a slew of unfinished 15mm Russians I’ve been sitting on for a couple of years now. At least with the paint reference cards I have some confidence I can revisit them again using the same color scheme as I had done in the past, ensuring that my army will have a uniform look. So consider keeping track of the paints you use on your minis. While I find note cards handy, but even a notebook is helpful. After all you never know when you might have to touch up a couple of minis (or add another squad to your force).
Bolt Action: Empires in Flames
 Warlord games has been diligently releasing their theater specific books and I was able to finally snag a copy of Bolt Action: Empires in Flames, their Pacific campaign book. This details quite a few parts of the entire Pacific and East Asia conflict from the initial invasions of Japan into China during the second Sino-Japanese war, engagements in Burma, to the final allied island-hopping offensive to take back territory from Japan. As with many of the previous books it not only covers some scenarios, special troop types, and unique rules for these games, but also provides brief historical background overviews of the conflicts.
The book is broken down into sections first dealing with the 1937 outbreak of the Sino-Japanese war, then detailing the rapid conquests Japan had during the initial part of WW2, up to the final years of the war (with Burma and the other major allied offensives being their own section). There are only 8 scenarios listed in the book, but taking a page from Ostfront, there are lists of scenarios out of the main Bolt Action book that are recommended as ones that would be applicable for that period of the war.
Although the scenario count is limited, many have some unique layouts in terrain to give them a twist from your typical games. Additionally, they employ some special rules incorporating night fighting, mines, or amphibious assaults, or ones more specific to the stress troops had in a jungle environment (like exhaustion, monsoon rains, or deep mud). There are also quite a few suggestions for the density and type of terrain that should be on the table for these games. I’ll admit it’s a little disappointing more rules weren’t included but there is enough to add some wrinkles to your typical game which could capture that feel of jungle fighting.
One thing that stands out included in the book is a complete army force list for Chinese national forces. If hankering to duke it out during the initial Japanese invasion into China, this book has you covered with some Japanese theater specific lists. But along with that is a complete list of units and vehicles that would be thematic for the Chinese national army at the time. It certainly is a very niche force, but an interesting option if looking for something different in your typical Pacific theater games.
Along with this new force list are also some new units for both Japan and the allies (both US and Britain), including rules for Mongolian Russian troops. There are a sparse number of heroes and a few vehicles. Most of the new units are for infantry troop selections. Rules for horse limbers and mule-packed guns are also presented as troop options.
Amphibious rules are presented, as well as rules for night fighting, city fighting, and minefields. There are some additional rules that attempt to capture the challenges of fighting in the jungle (monsoon rains and deep mud). Another interesting rule tweak is exhaustion. This rule potentially strips away troops from infantry and artillery units. Exhaustion can also impeded Run orders (units must always check leadership, even with no pins) and units in reserve are more difficult to bring in. It’s a bit of a gamble if playing with the jungle specific rules for exhaustion as it can randomly effect just the attacker or just the defender (or possibly both sides).
The Good – The book provides a nice overview of the different types of engagements that typified warfare in WW2 for this region. Touching on the years up to the start of the war, along with the initial part of the Japanese military campaign is also welcomed, as it’s something not quite visited in typical WW2 rules.
The theater-specific rules are okay and having additional units are always welcomed. The detailed scenarios aren’t groundbreaking but do offer some different challenges from your standard Bolt Action game. It’s especially nice to have a complete army list and theater-selectors for a Chinese national force, which certainly stands out from your regular Pacific wargame book.
As with many other Osprey books, the art is great. It’s well organized and having the special rules dedicated in a single section at the end of the book is nice.
The Bad – There is a lot of ground and history to cover, but it would have been nice to provide some more scenarios. As with many of the other books, a fair number of scenarios are presented more as generic battles with a Pacific flavor rather than detailing a specific battle. Even though the horse limber rules are presented again, it’s a shame the rules for flag bearer units weren’t included.
The Verdict – Empires in Flames is a niche book. It certainly is for a player wanting to focus on the Pacific war. Most of the rules covered have been seen elsewhere in other campaign books (although it’s nice to have them collected in one book here again). So if looking for tons of new rules, some might be disappointed.
Additionally the number of scenarios provided might be considered a little sparse. However the ones provided offer a nice snapshot of the particular types of battles seen in the Pacific. There are quite a few suggestions for table layouts, special rules, and theater-selector lists to use too.
I think Osprey has hit their stride with putting these campaign books out. Empires in Flames manages to present a wide range of different conflicts in the Asian region well. I don’t consider this book a must have for everyone. But if war in the Pacific is your bag, you’d be remiss not to pick up this campaign book. It’s got a lot of meat in between its pages to keep a Bolt Action fan happy.
Wargames Factory Saxon Thegns
As I mentioned awhile back I’ve been dragging my feet some painting up my SAGA warbands. I wanted to have some flexibility with my models and opted to pick up a few more sets of figures to build both Anglo-Saxon and Anglo-Dane warbands. Further a lot of battle board abilities for Anglo-Saxons revolve around 10 man units. Having a lot of warriors seems the way to go, so I wanted quite a few models to explore these abilities more.
Wargames Factory’s Saxon Thegns come 32 figures per box. There are plenty of head, shield, and weapon options. A few standards and horns are provided. While not specific for SAGA you also get a lot of bows which are great for other game systems (cough…Frostgrave…cough) and if looking to combine this with other plastic unarmored Saxon sets, a good way to have plenty of bows for your levies. There are also hefty 2 handed Dane axes allowing you to deck out some hearthguard if wanted. My one complaint with the weapons would be that the spears look a little anemic.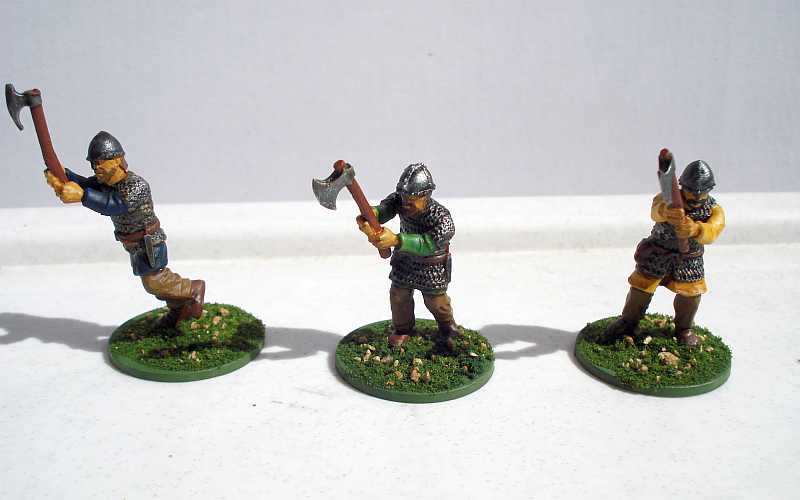
My other complaint would be the necks of the models. The manufacturer suggests cutting down the neck some before assembly. This is a bit of a pain and can be difficult to get just right. Fortunately the models are plastic and with the right amount of glue and pressure, you can get them assembled in due order. I would recommend going for a more viscous plastic cement. The figures fit well together, but you might want to fill the gaps in some for the arms.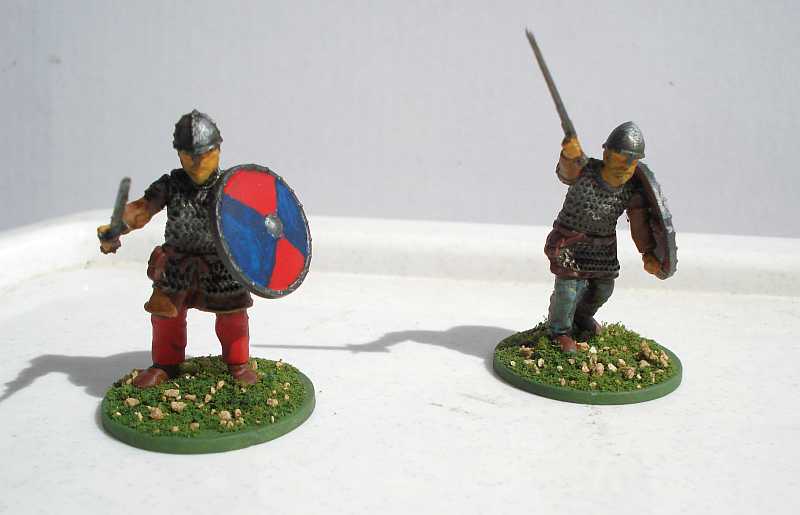
The hands are modeled open to allow different arms to be placed in. The thumbs look a bit odd sticking out but once you’ve got weapons set in the hands, they don’t stand out. Overall the models assemble pretty easy aside from the slight hiccup with the heads. The detail on the figures are not bad. Some of the body and arm details are muted, but overall they look good.
You basically have 4 bodies for the set. Yet with the options for heads and arms, along with different angles you can assemble them, the end result is enough different poses to make up for the lack of body types. One more ding to the set is that no bases are provided. So expect to buy some bases along with the box.
Another manufacturer out there for medieval plastic sets is Gripping Beast. Likely people will want to know how well the 2 figure lines compare. The pic below is from each company for Saxon Thegns. The one on the left is from Wargames Factory and the one on the right is from Gripping Beast. I think they are very comparable for scale and can mix and match them freely. If anything the Gripping Beast figures seem a little more stocky in the arms and shoulders. Yet once painted up and based, they don’t really stand apart from each other.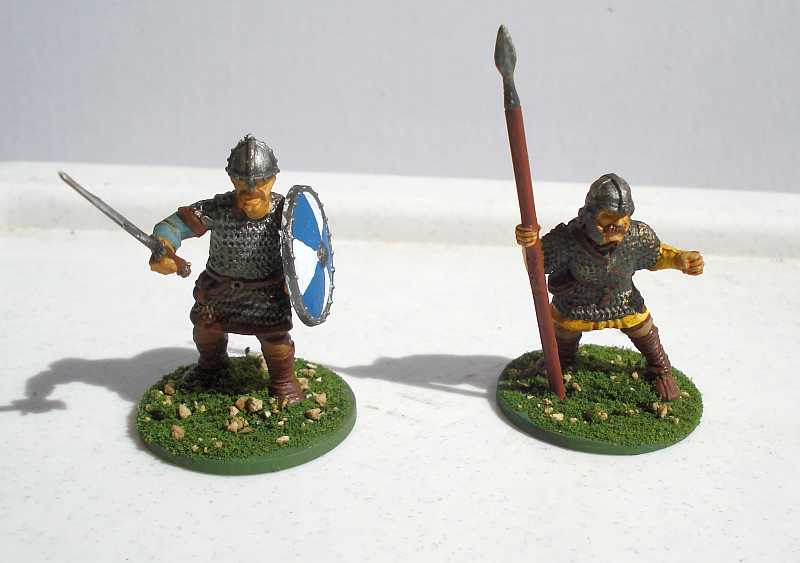
There are a lot of positives for the minis in this box. The Wargames Factory kit does have a lot of different weapon and shield options. The head choices aren’t bad (though are a chore some to glue onto the bodies). The price is also reasonable for what you get and I’m glad to have picked them up. However, I’m on the fence about recommending these Thegns. They aren’t bad figures. It’s just that for armored plastic Saxons I think there are better options out there.
Red Army – Wargames Factory
 For a long while now I’ve been pretty much sticking with 20mm for my Bolt Action platoons. I’ve accumulated quite a few different nations dabbling both in the Pacific and European theaters. Usually when I jump into a wargame I end up picking up enough models to fill out a couple of armies. It’s just so much easier for me to spark someone’s interest in playing when I’ve already got an army for them to try out. So for Bolt Action, going 20mm was not a problem at all for me.
However I realize that if I was dumped into a gaming scene where I’d be typically playing against folks with their own armies, well, I guess they might frown a little on me pushing around 1/72 scale troops and tanks. So I wanted to work on another nation army that would be a ‘proper’ 28mm scale and settled on fielding a Russian force. One aspect of my choice was that I’d be able to dig up some 1/48 scale armor and vehicles. I could have chosen some other smaller nation, but rounding that out would likely be difficult. The downside of course would be that I’d have to whip up a lot of models. Russian armies work with having lots of bodies so I certainly wanted to look into plastic kits.
There are a few options out there but in the end I decided to make the bulk of my troops from using the Red Army box sets from Wargames Factory. These are pretty nice sets of around 30 figures with a variety of small arms. Most weapon options are for Mosin Nagant rifles and PPSh-41 smgs, but there are quite a few DP-28 lmgs and various sniper rifles also. My complaint would be that I wish there were more rifles. You can get about 15 figures with rifles from a box set. From my 2 sets, I wanted to squeeze out a 3rd rifle squad but it looks like I might have to stick with making that a smg scout squad instead (was able to get a free 12 man rifle squad though for a total of 3 rifle heavy units).
The figures are pretty well sculpted with a fair amount of detail. It’s hard plastic that is a snap to assemble with cement and they don’t appear to have excessive mold lines (although there are some and you can see from the photos I still need to trim more). Another small bit I love about the box is that lipped bases are also provided. There are a couple of prone figures that don’t get any benefit from the bases, but it’s a nice touch.

There are a variety of heads but most are with helmets with a smaller proportion having caps. There are a some officer caps and a few female soldier heads also. As a nice touch, you have the option of making a couple of female troops which is cool. Something historically accurate and adds a little variety to how your force looks on the table. I made one of my sniper teams women and working on converting my field medic to be female.

As pistols and other accessories go, the sprues are a little lacking. They are present but in a limited number. However there are tons of ammo pouches and field kits. So certainly you can deck out your troops to have some additional details. I will grumble some that the entrenching tool and canteen are modeled as a single piece which somewhat limits options for attaching them.
Arms are modeled individually and at first I sort of groaned looking at this, worried how much of a chore it’d be to piece them together properly. However each arm is paired by letter along with a matching body figure making it a much easier process. Still, you’ve got individual arms, heads, and other gear kit bits to glue. Expect your assembly of troops to take a while.

Nonetheless the end product is fairly good. They are digital sculpts but they look like they can handle some detail rather well. I’ll complain about wanting more rifles, but there are enough different weapons between smgs, sniper rifles, and lmgs to provide lots of options. While most of the bodies are single sculpts, with movable arms and heads you can get enough dynamic poses to give the models variety. Adding more kit options and about 5 body figure types, you end up with enough to make your force look engaging with plenty of differences in poses. Hands down, the quality and price for these kits are hard to beat and are an exceptional value for wargaming. Well worth looking into to bulk up your Russian force.
Building ruins for Frostgrave
I find Frostgrave fun especially with its low model count and small table space. However as it takes place in a ruined city, you certainly need a lot of terrain pieces. It does demand having a pretty cluttered layout too, so that was something I had to assemble for my games.
Over the years I’ve gotten a little lazy with terrain. I just don’t feel the need to put tons of time into building and painting it. I just need something serviceable and looking decent enough. I’d rather put more time into painting miniatures over building an awesome house. So I was looking for a quick and dirty way to whip up some building ruins.
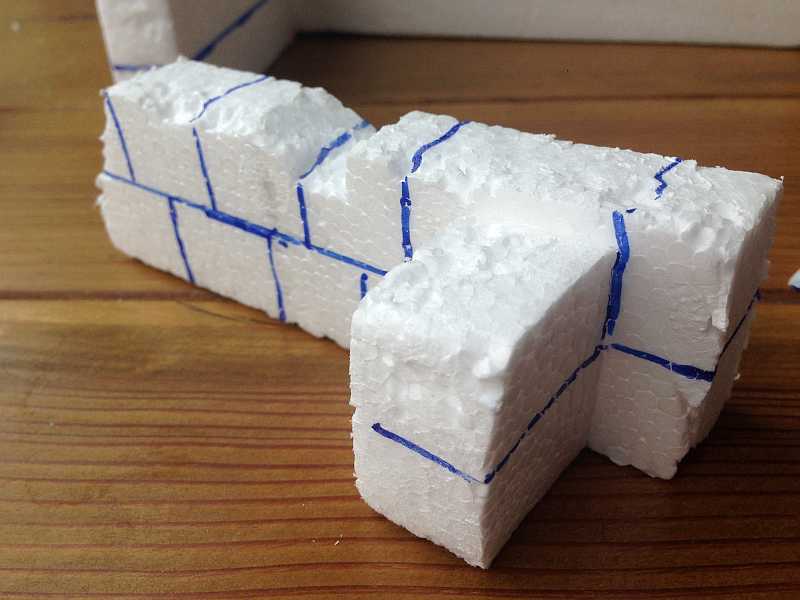
I settled on hacking apart some old styrofoam I had horded from packaging material. Cut apart into sections and assembled with PVA glue and toothpicks as simple dowels, I got a few sections of walls put together. I also went ahead and got a few flat pieces with some odd chunks added to create some crumbled wall sections which would offer a little cover from ranged shots, yet not impede movement much.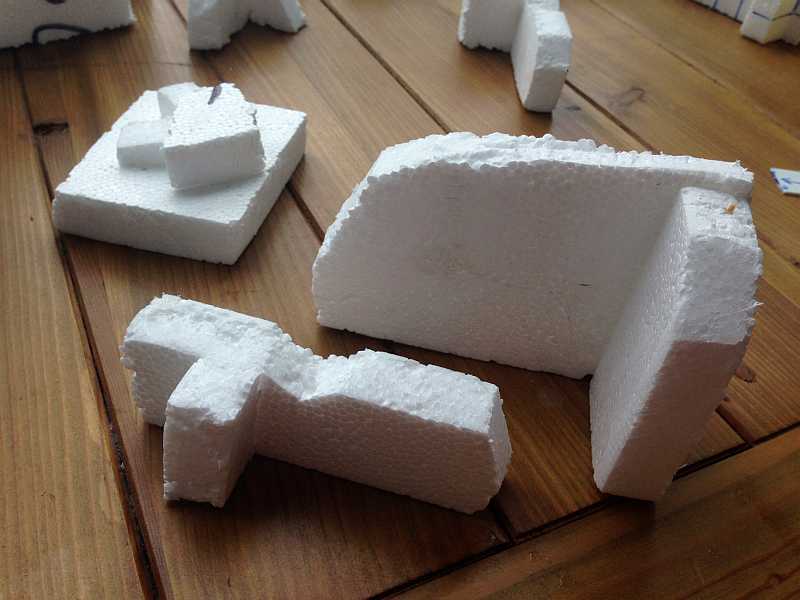
I had to try and work on adding some texture to the walls some. I decided I didn’t need to make an intricate pattern, just some large stones etched into the walls. As a super quick way of doing that I figured I’d need some guide lines. Using a small piece of plasticard about the width of the bricks I wanted, I quickly placed tick marks on as layers of bricks.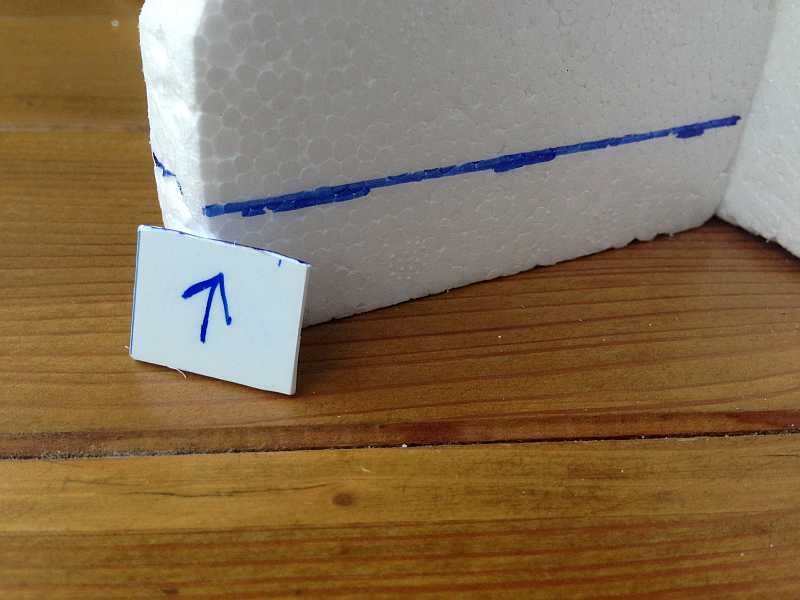
Then I connected everything using a straightedge and a marker to form horizontal lines. One key tip would be to make sure you had all the lines even around the corners. I would then go back and rather unevenly draw in vertical lines to make the brick pattern.
 I needed some way to form some texture in the surface though. I could then go over each line with a knife, but figured that would take a lot of time. Not to mention I might end up gouging out larger chunks of styrofoam if the knife caught up on the material. Instead I used a soldering tool which would melt the styrofoam. Mind you this was tricky as you could easily go too deep into the material. Also, I would do this in an exceedingly well ventilated area (I also had a fan behind me blowing air away from me) as the fumes are pretty toxic. However the end result was pretty nice.
All of this worked fine and dandy for low walls but I also wanted to get some elevated pieces together. I had some second level wall corners made that used a chunk of foamcore board as the floor section. This looked okay but I also wanted to give the floor some texture. I ended up cutting out thin sections of cardboard and gluing them in as flagstones. I didn’t need to do the entire surface, just enough to give the appearance of a few stone pieces. With a wash and a bit of drybrushing, they really add some texture to what would look like a flat piece of foam board.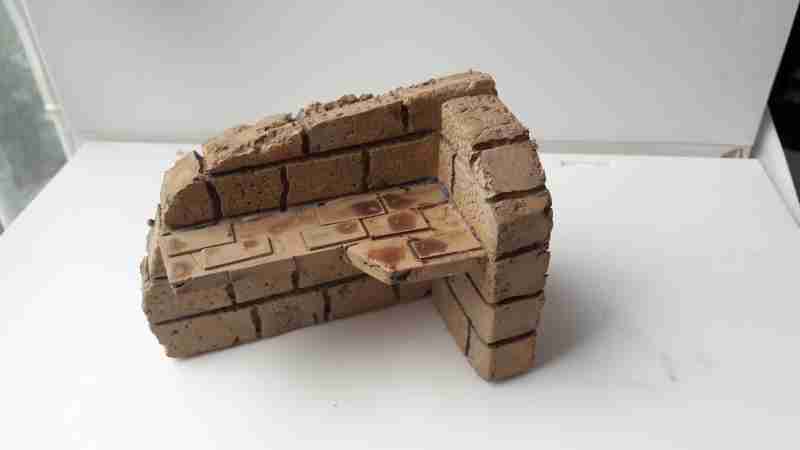
I’m pretty happy how they turned out. They look decent and are certainly cheap assemble and paint. Lastly, I was able to get a nice amount of terrain to put together for my Frostgrave games. Give it a try if you need a quick and dirty way to make a bunch of ruins. I’m doing a bit of a different setting for my games to match up with using current models, but these would look just fine on a snow battle mat.
Drones and Probes for Gates of Antares
I haven’t taken the plunge yet for getting an army together for Gates of Antares. Instead I’ve been using a lot of my 15mm sci-fi stuff as proxy forces and have been having quite a bit of fun. Maybe later I’ll consider eventually getting a batrep done. Seems 15mm is a great way to jump into the game if on the fence wanting to give the rules a test drive.
I’m liking the Algoryns and might work on that faction. However Warlord Games is still trying to expand that model range for them. And sadly the choices for that force are only in metal. While I dig the heft of metal figures, the cost compared to plastic kits is pretty hard to swallow. Might have to clear my bench some of stuff to paint before I consider jumping into another range of models.
Nonetheless one thing I’ve been missing with my proxy forces is a way to represent drones and probes. GoA uses gobs of em. I really dig having some small bonus abilities represented by models on the table. However I wanted to actually get a figure down that I could push around over just using tokens or painted bases.
I picked up some cheap plastic beads I felt would fit the bill for using as probe models. The cost for a huge gross is dirt cheap. Just head to a craft store and check out the craft jewelry section. Being about 7-9mm across, they are perfect for drones.
I wanted to have them floating about though and was considering using some wire, but then I stumbled on some clear plastic tubing for modelling. The material is acrylic and the stuff I got was in 3mm diameter. Perfect for mounting a floating drone onto a base.
The pickle I had however was that the tubing was pretty large so I had to drill and file a larger hole into the plastic bead. Fortunately the beads have a hole already in them (for stringing wire and string through). So I could easily use those as a guide hole when using a larger drill bit. Drilling and filing a portion out of some 20mm slot bases, I was able to use a bit of instant bonding cement to assemble the entire thing.
The downside of using beads is that there is a small hole drilled into the top of my probes. So I had to use a bit of green stuff to fill it it. I also used green stuff to fill in the gaps for the slot base.

A bit of paint, drybrush a tad, some flock for the base, and bam…there’s a spotter drone. One thing I like about the model is I can use a variety of colors to indicate different types of drones and probes. The downside is that the beads have a particular pattern on the surface making my painting schemes a limited some. This was a quick prototype and I didn’t quite get the pattern and look to what I’d like, but I can touch it up later.
Hope folks find this helpful. It was super easy to do and pretty cheap. Considering you can end up with a lot of spotter drones for your units, along with support choices, I think you’ll end up needing quite a few drones for your typical GoA force. This isn’t a bad way to get a lot of models assembled for your force quickly (and cheaply).
Hotz Mats felt fields
A long while back I mentioned that I picked up some battemats from Hotz Mats and wasn’t that impressed with them. At the same time I made my order, I decided to pick up some flocked felt field sets from the same company. Despite me not being keen on the treated felt mats, I gotta say that I do like the flocked fields they offer.
I bought 2 sets of the 20-30mm range felt fields. The fields vary in sizes and colors that look pretty good for that scale. Seems they offer smaller scale mats for 6-15mm. The pics I have here are of 1/72 scale Germans. It does seem that smaller models would look a little off with the larger scale mats.

The felt fields are durable though and the flock is tightly adhered to the material. Mind you I keep them stored relatively flat tucked in a box of other terrain, so if tightly rolled up I’m not sure how they would hold up. But I have to say they’ve been through some heat and humidity and still look nice. Through normal gaming wear and tear you’d likely have some fields that would last for years.

The felt fields range in size having one large section, 2 smaller fields (a little over 6″ long), and a mid-sized field. A good mix for a set which looks nice. Throw in some small stone walls or bocage and you’d have a nice bit of rough terrain or light cover for your table. If looking to get some rural terrain and not too keen on modeling your own, they are a good option and worth picking up a set or two.

Jungle terrain using plastic plants
I’ve been slowly working on some more Pacific-themed terrain for Bolt Action. One stickler for me was getting some appropriate woods for a table together. I’ve got some decent trees that could work for deciduous forest, but really nothing that would work for jungle terrain.
Cruising through a small pet store I stumbled on some inspiration finding fish breeding bedding for aquariums. This lead me to also hitting up a local arts and crafts store to buy some plastic floral arrangements.
With a craft knife and a hot glue gun, I was able to remove sections of plastic plants and mount them on metal washers. A coat of plastic primer and flat green paint, along with a simple drybrush of a lighter green and I was able to whip up quite a few stands of jungle trees and overgrowth. I cut many sections at varying heights and mixed and matched them to provide a little more realistic look.
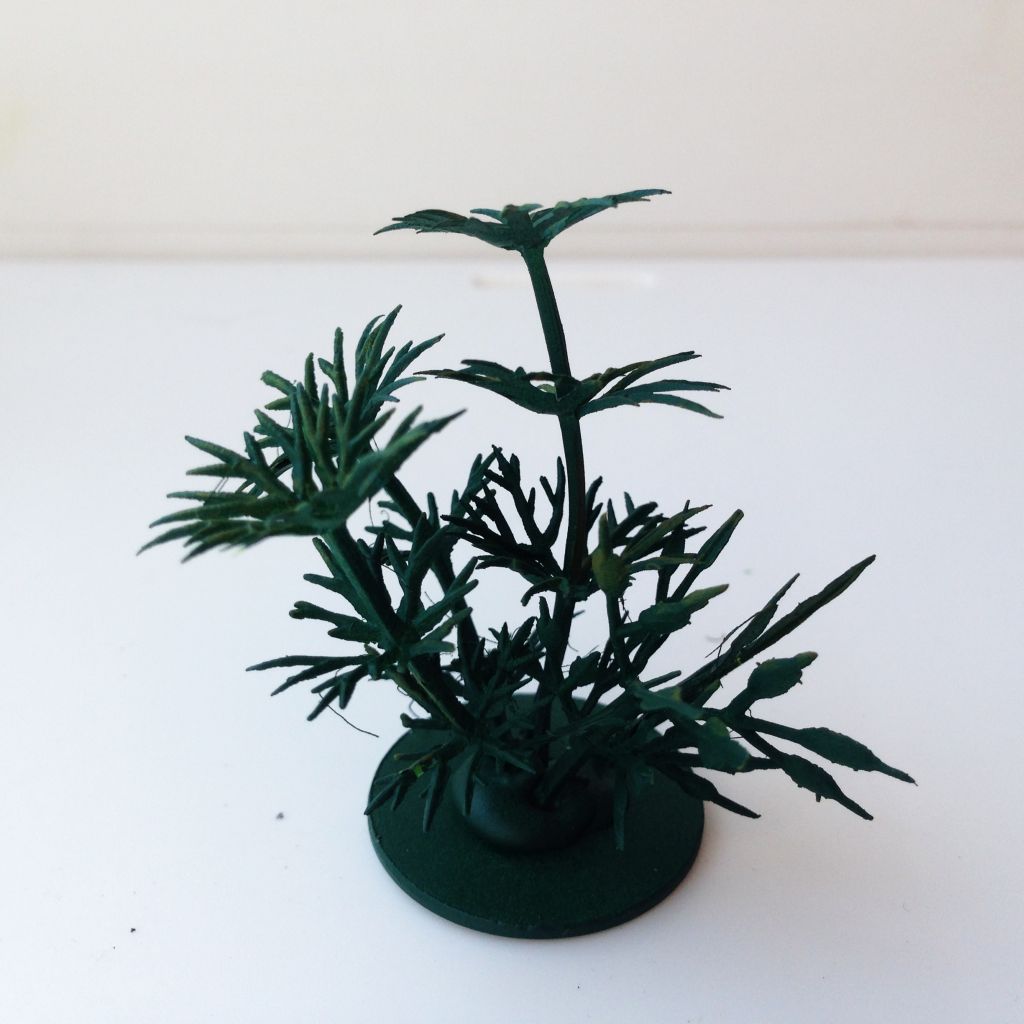
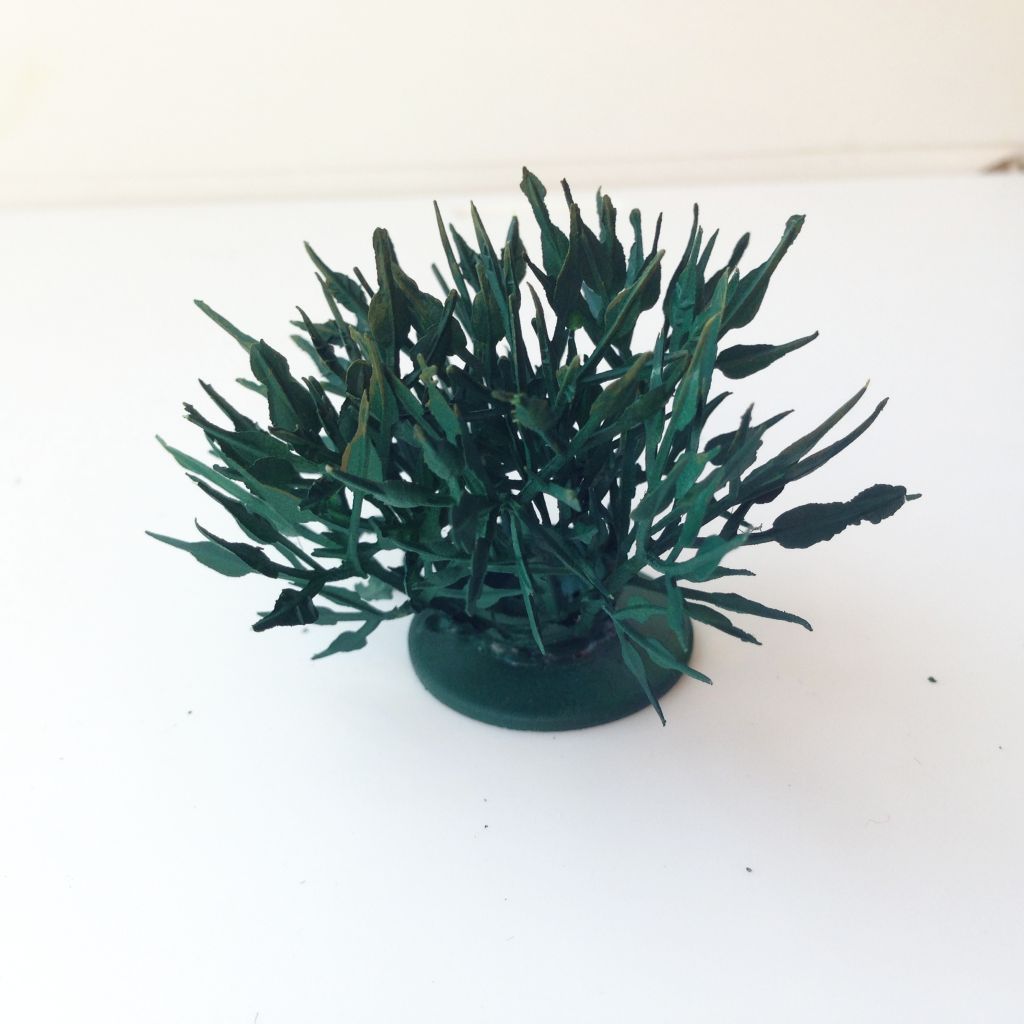
They really look pretty well and being on separate bases, I can move them around to accommodate larger teams and vehicles. Next to some 20mm Japanese troops I painted up, they’ve got an appropriate height and occupy a good chunk of area to offer cover. They were also a snap to get together. Certainly one of my more easier terrain projects to complete. Making trees and jungle terrain this way is easy and offer some decent terrain for your Pacific theater games.

Extreme ranges for Bolt Action
A long while back I introduced some house rules for Bolt Action that I use for my games. Just some tweaks to a few odd things I find a little quirky with the rules. One thing that I’ve stewed a bit on however are the ranges. I understand why they are so truncated. For a wargame to be played on the dinner table and trying to encourage maneuvering with squads, you can’t have ranges covering the entire play area.
Now a lot of gamers have a beef with this and cite it as a huge flaw with Bolt Action. I’d totally agree for some weapons it throws all simulation out the window playing the rules as written, especially with tank guns that were actually reaching ranges of a kilometer or more. So a lot of folks lean towards other systems where ranges are longer distances or simply cover the entire table. However for infantry weapons there are a few documents which claim field manual distances were fairly exaggerated. Actual combat engagements were much closer, having rifle fire up to ranges of 300 yards, with truly accurate and effective fire being at only at 100 yards. With short distances like those, 24″ rifle ranges might not be too far off from what was actually seen on the WW2 battlefield.
There was one thing that stuck out for me when reading Battlegroup (another great set of WW2 miniature rules). That was the idea of fire at extreme ranges which could only be used for suppression. Battlegroup has effective ranges for all weapons that can inflict casualties or damage armor. However there is no max range and players can freely fire at anything on the table top that they can see. However these long ranges are limited to area fire only. It’s hard to land a hit and if you do, you only get to put a pin marker on your target. It is for suppression only and you need a ton of firepower but it’s an option.
This is certainly something I could use for my Bolt Action games. A fire mode that was difficult to achieve hits beyond maximum range and would only result in pins. I still wanted to cap out ranges though, but stuck at simply doubling listed ranges. Even for armor this could be used, but like rifle fire, could only potentially pin a target. So I decided to incorporate this into my own house rules. You can find a detailed explanation of the rule below.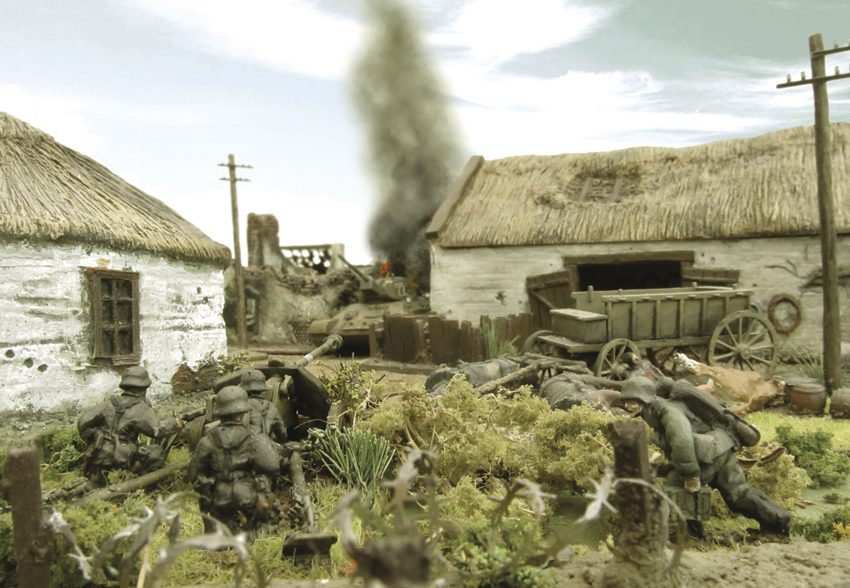
Extreme Range – On a fire order, all weapons can fire at targets up to twice their listed range. Weapon fire at this extreme range only hit on 6s on 6s as per Nigh Impossible Shots (pg 37). All hits do not inflict casualties or vehicle damage, regardless of their penetration value. The target will only suffer one pin instead if hit (suppression does not apply). Armored vehicles, whether they are open topped or not, ignore all small arms fire at extreme range. Vehicles hit from weapons of +1 pen or greater suffer a pin as per the Tank War vehicle rules (veterans ignore hits if the weapon cannot penetrate their armor, inexperienced units gain a pin, etc.). Note that weapons which can cause more than one pin such as HE weapons still only inflict 1 pin at extreme range. Flamethrowers and indirect fire weapons firing smoke cannot use this rule.
Gripping Beast Saxon Thegns
While I enjoy SAGA I need to admit Frostgrave has sort of taken over my painting drive. I assembled my SAGA warbands a long while back but actually giving them a coat of paint has been a chore. I’ve really been dragging my feet on them. Love the game but my spark for painting the figures consistently seems to flare up for only a few days and then die down to a smoldering ember for months.
But I’ve managed to get some troops painted up. One big draw for me getting into SAGA was the relatively low model count and cheap options for figures. I decided to pick up a few sets of Saxon Thegns from different manufacturers as I wanted to build both Anglo-Saxon and Anglo-Dane warbands. That way I could switch around some of the hearthguard and warlord models, but keep much of the core force of warrior models the same.
I opted for one box of Gripping Beast Saxon Thegns. They are a nice set of plastic figures for a decent price. You get a whopping 44 minis, including a sprue to make a standard bearer, horn blower, and some details like a cloak to deck out one model making it your warlord. For Anglo Saxons a lot of battle board abilities revolve around 10 man units. I’ve puttered around with a few hearthguard but I’m now leaning towards using more warrior units to take advantage of the 10 man abilities. So having a lot of extra figures is welcome.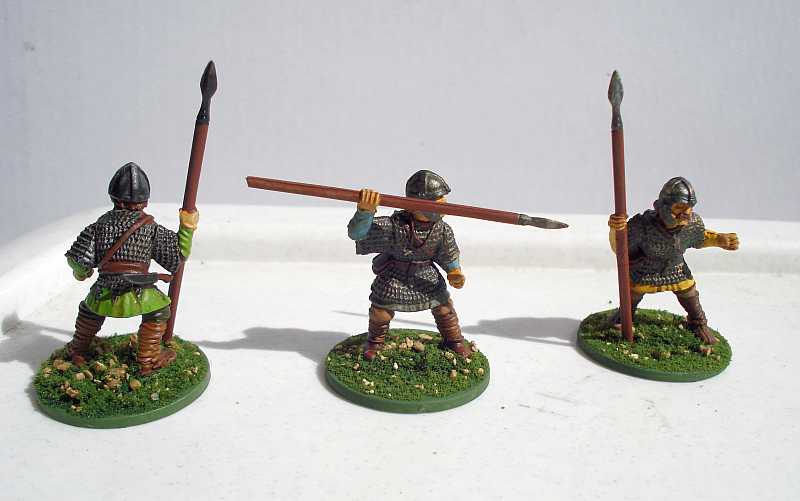
The plastic figures are well detailed with some nice armament options. You get 5 bodies per sprue with a few extra to make up the command elements. They assemble well and are pretty easy to glue together. Square bases also come with the set including some larger bases for single ranks. I’m using round bases instead but it’s nice to have some included in the box. I’m no expert but the gear and figures seem historically accurate and it’s nice to see a ton of spears in the set also.
I’m slacking on the historical accuracy some though. To keep things clean with WYSIWYG with the warrior units in SAGA, I’m keeping them in mail armor and dropping the shields. This is passable with the figures I’ve got, but I’ll admit the right arms are sculpted to accommodate shields. I decided to base them without shields, saving those for the hearthguard.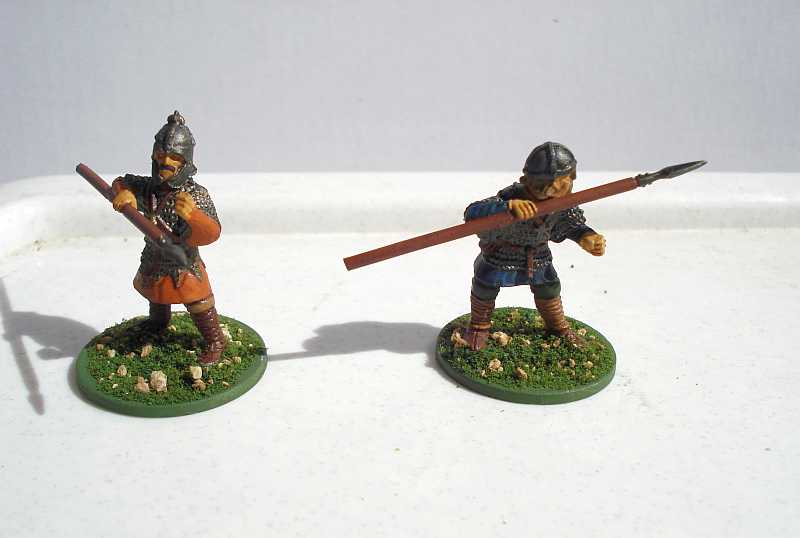
Now another manufacturer floating around with nice medieval plastic sets is Wargames Factory. I imagine a lot of folks would like to know how they stack up and could you mix and match them. The pic below is of two Saxon Thegn figures from each company. The one on the left is from Wargames Factory and the one on the right is from Gripping Beast. I think they are very comparable for scale. The Gripping Beast figures seem a little more stocky in the shoulders and arms, but painted up they don’t really stand apart from each other.
Overall if I was pressed to stick with one set over another, I’d go with Gripping Beast figures. The minis have a little more detail. There are some nice small bits that stand out (like necklace crucifixes) with the Gripping Beast Saxons. They really are fine minis for a good price and work great for getting up a core force of rank and file figures for your SAGA warband.
