Category: Terrain
Spartan Games terrain Kickstarter
This popped up on my radar. Spartan Games for a long while has been in the wargame and mini business. They’ve really grown into making some stellar resin miniatures and I’m a fan of Firestorm Armada.
It looks as if they’ve decided to dabble a bit in making terrain. There is a Kickstarter campaign running now to offer miniature terrain sets. What’s pretty clever is that it’s a modular frame system, where different artwork for the walls and floors can be swapped out depending on the genre you are playing. While much of the flooring and walls are card, it appears that parts can be upgraded to acrylic and laser cut MDF.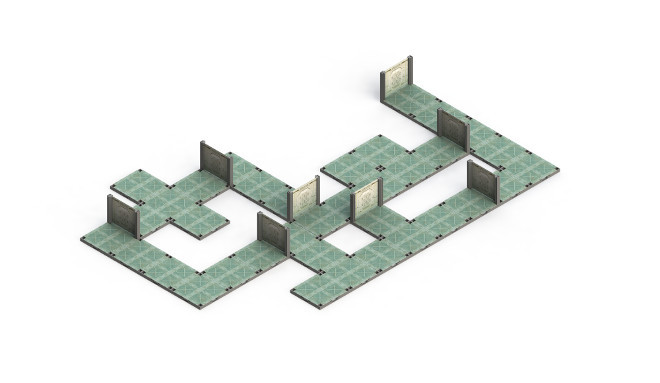
It looks pretty neat. The sets seem reasonable. However my beef would be with the artwork packs. Seems the lower pledge options are for one style of artwork (reasonable), but if wanting to get another style of walls/flooring, you are going to have to pony up about $30 USD and that’s without shipping.
Regardless, it appears this will be a product that they’ll be eventually pushing out into retail. If it looks like something that would tickle your fancy, the KS campaign likely would be a great way to get some of the sets accumulated.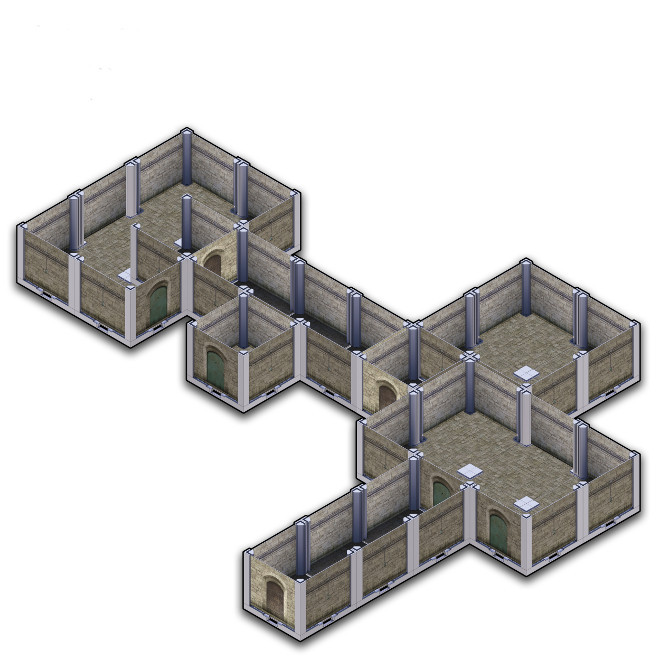
Wargaming in Seoul – Orc Town
A while back I talked some about places where you can pick up different wargame supplies in Seoul. One place in particular was Orc Town. They recently packed up and moved to another location, so I thought I’d give them a visit and check out the new store.
Orc Town is now in the southeastern part of Seoul in Dongok I-dong. If you take subway line 3 and get off at the Maebong station, Exit 4, head south a few blocks alongside an apartment complex. Go past a main T intersection and one block west, you’ll eventually hit the store. It is now in the basement of a small business complex.

Be sure to look for the small sign on the side of the building over the basement stairway.

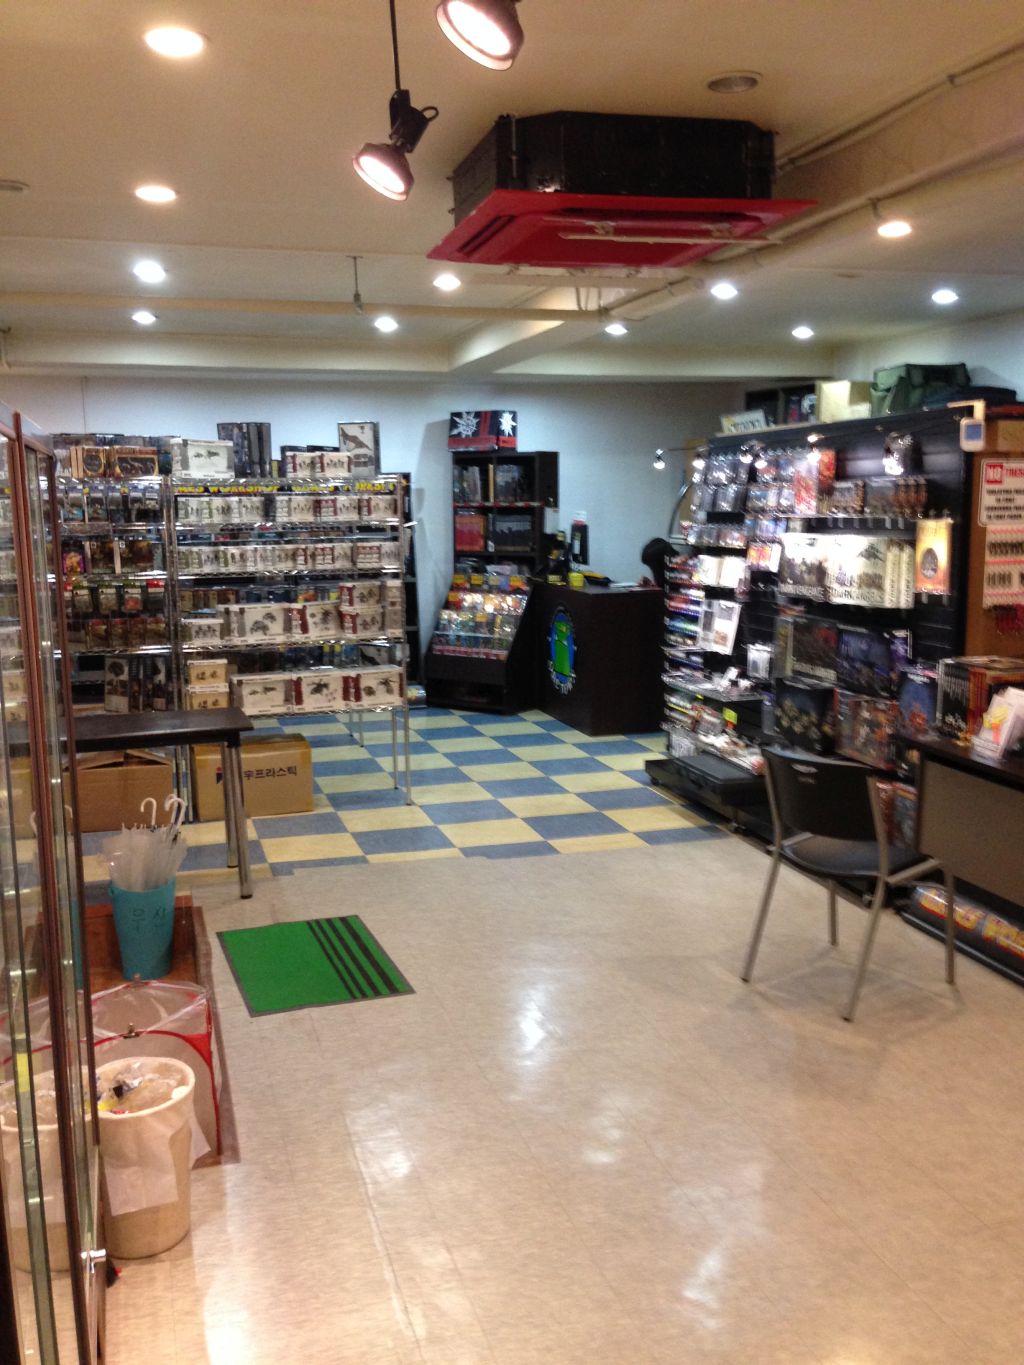
It’s certainly much bigger than the old shop. There is a small storage section where folks can leave their models in personal lockers for a fee. This is pretty nice for regulars as they don’t have to lug their models around to the store.
The new place has more space to play, with a side room just for gaming holding several tables. From what I remember, the gaming section here has almost double the number of tables from the old place. They also have a few shelves with store terrain to allow players to dabble in some different scenery layouts.


They seem to still carry similar products, including Infinity, Bolt Action, Firestorm Armada, a few Napoleonics and a smattering of other historical kits. There are also some Flames of War miniatures and some alternate 15mm WW2 sets. However Orc Town is still very much a Games Workshop store. They carry lots of 40K stuff and a good number of Warhammer Fantasy minis. The store also has a full line of Citadel paints, spray primer, and other GW hobby modeling supplies.
Sadly, I still think prices above retail particularly for non-GW products. No real clue how the prices for GW products fare but I noticed some of the Warlord games stuff being well over MSRP. I have no idea why. Maybe they can’t get distributors to send stuff over and have to go the route of resale (which likely includes having to pay extra custom fees on merchandise).
They have an online store and I’m guessing with pre-orders, you could get more of a discount to bring it in line with other international distributors. For a handful of items, given that you’d have to pay international shipping charges, it seems ordering directly through Orc Town works out maybe a little cheaper. However I do wonder if making a large order, getting a big a discount from an online retailer, and just paying extra shipping might be more economical.
Nonetheless, if you want to pick up a few models and paints Orc Town seems to fit the bill. If you are a GW fan, it’s the only place to shop. I’d also give it points for allowing space in their store for gaming. Certainly a great way to get some feelers out to meet up with other fellow wargamers.
Armourfast house
While my Bolt Action platoons have been slowly shaping up, I really needed to get some terrain together. I went the super cheap route getting some paper buildings made which came out okay. However getting troops inside a building can be a key part of the game. My paper models have the roofs firmly affixed to help keep them a sturdy construction. While I can lift them up and plop them over figures to represent troops inside the house, having models with detachable roofs would have been better (seriously have to consider working on making some with foam board).
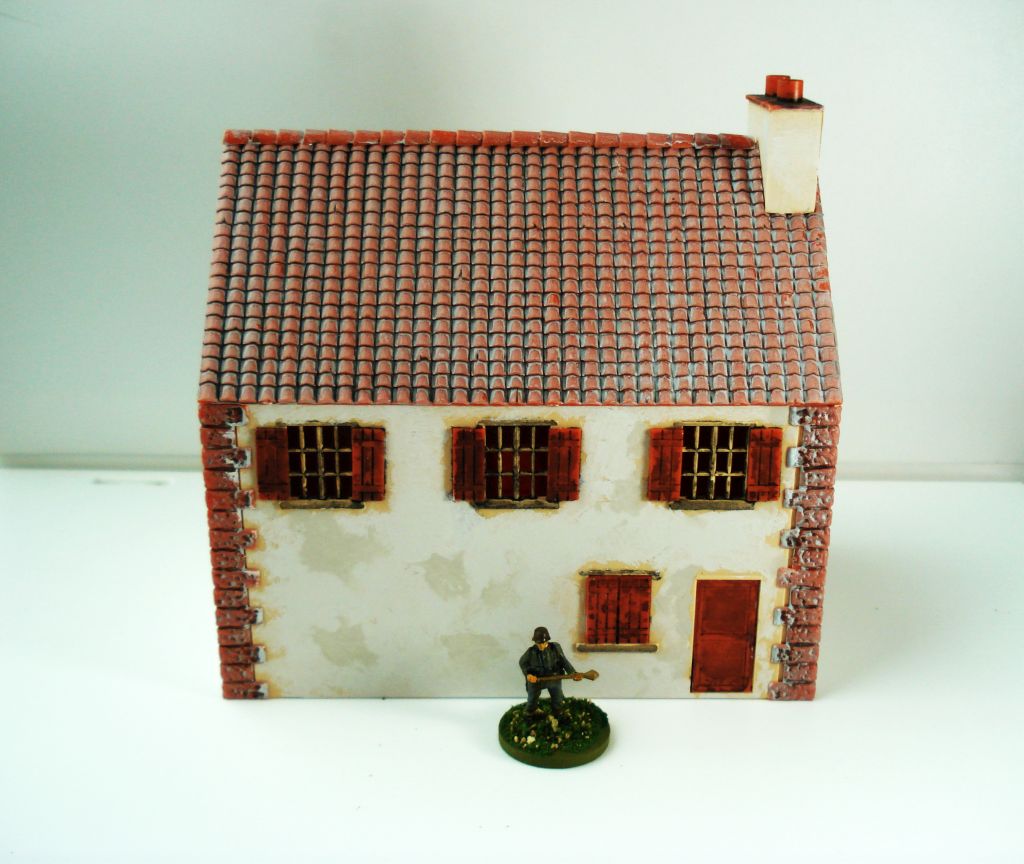
Looking around for some options, I ended up buying a tile roofed, 1/72 farm house from Armourfast. The kit is very nice if a little pricey at $14.50 USD. The model comes with varying colors so that you could literally assemble and play without the fuss of painting. I somewhat embraced this and opted to give the model a very basic one-over with some washes and drybrushing.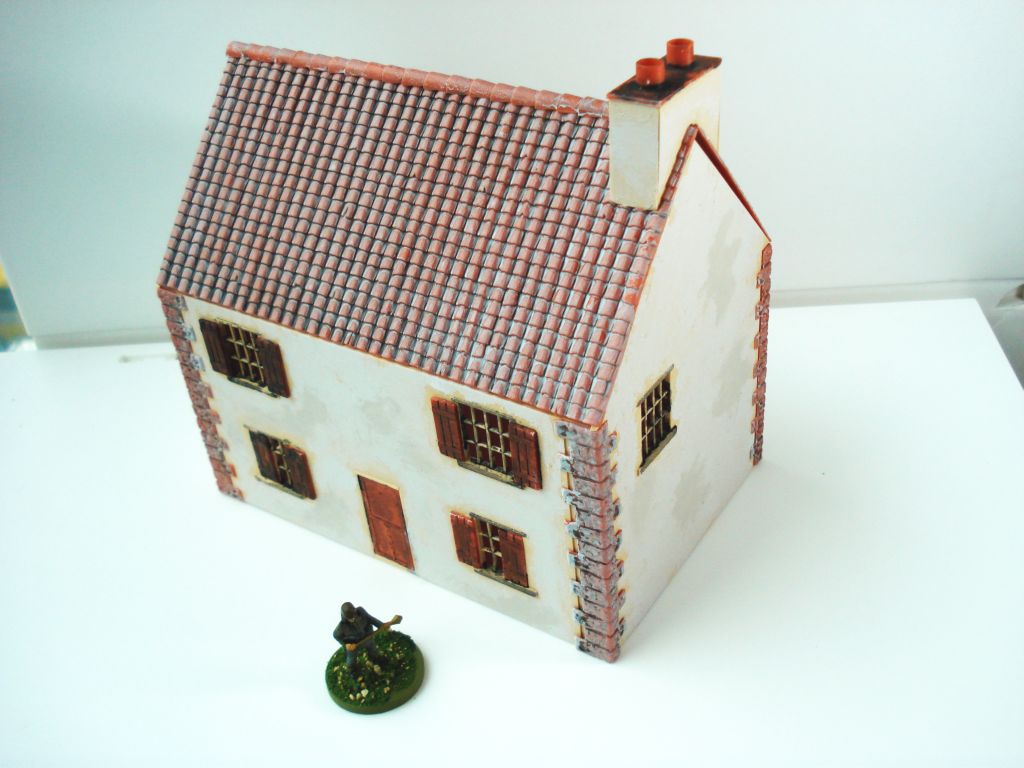
The house is simple to assemble and offers some decent options regarding the windows. There are a slew of window shutters you can use to represent open or closed windows. The roof and chimney can be put together without breaking a sweat. I will say however the instructions are a bit sparse and I did have to think through the construction a bit, as there are certain ways the walls for the house and chimney fit together. Nothing brain burning, but be sure to take a bit of time looking at how the pieces fit together.
Still, working with the plastic was a breeze and a welcome change compared to thick blocky houses of resin. The pieces fit together very well, with the roof section sitting fairly snug on the house walls and easily removable. Additionally, the inside walls have small tabs on them, allowing you to put in a second floor if needed. I cut a section of board to do just that and it fits nice and secure, allowing me to get a little more coolness out of the model.

The scale of the model is for 20 mm figures. I have one of my Plastic Soldier Co. mini in the some of the pics here to give it some scale. Honestly, the house would work just as fine with 28 mm figs. The doors would be a tad small but the space on the table is pretty beefy. Overall the model measures 14 cm by 9 cm, with the peak of the rooftop at 11 cm. I find true scale 28 mm buildings end up occupying too much tabletop real estate. Something a little smaller looks passable and doesn’t seem like a brick of plastic on the table. If you need a quick bit of terrain for your table and looking for something flexible, consider giving this house from Armourfast a look.
Cigar Box battle mats review
Ever on the quest to find some cool gaming mats I stumbled across Cigar Box Battle Mats and had to pick a few up. A while back I had gotten some Hotz mats for my Bolt Action and Firestorm Armada games. The star field mat was okay while the green mat was a little lackluster. Further, they were treated felt. The surface looked like it could handle pilling but it was stiff and kept wrinkles if folded up.
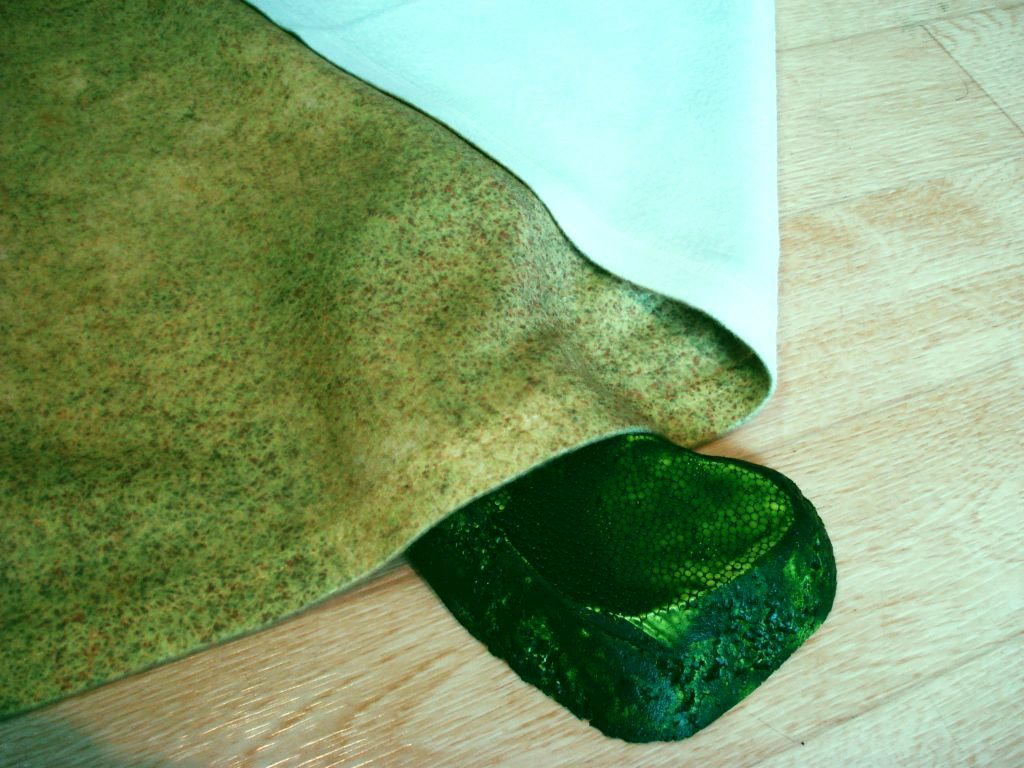
The battle mats from Cigar Box are made out of a thin fleece material. It’s very supple and has a sheen surface that will not snag on miniature bases. Most come in 4′ x 6′ with a few mats measuring 36″ x 36″. You can machine wash the mats and the surface appears to be screen printed making it look pretty resistant to your normal wear and tear.
The star field mat is very muted, but has a nice generic look. All of which allows you to plop down whatever terrain you have and not look too out of place clashing with something printed on the mat itself.


The generic grass field has a nice textured look to it. As the material is so yielding, you can put hills under the mat. This is something I found an issue with the Hotz mats as the treated felt was rather stiff. For a basic open field, the Cigar Box mat looks good with just a little contrast to break up the entire surface.
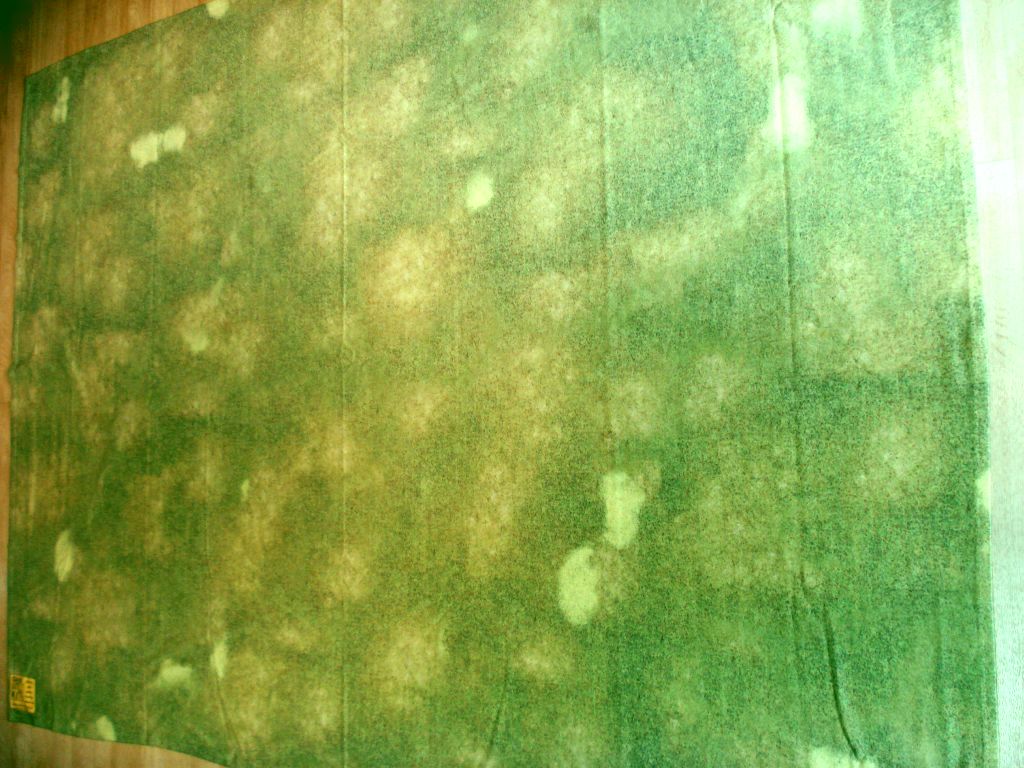

Digging through the store, there are also more elaborate patterns which can highlight roads, fields, and forests. A few even are set up to portray classic civil war battles, but could work for different historical engagements too. There is a pretty impressive variety and fortunately some generic mats are also available.
I think one ding to the mats would be that you’d have to double up if needing a 4′ X 8′ mat as the size options are limited. The mats are also ideal for free miniature movement as there are no hex or grid options.
The service was quick and I got my order via international air mail about a week after it was shipped. They were also very quick to respond to any queries via email. I highly recommend these mats. They are durable, provide a good gaming surface, and look great. Well worth picking them up for your games.

Scratch built scouring pad trees

My Bolt Action platoons are shaping up and I’ve been on a bit of a kick to get some terrain whipped up. One thing I sorely wanted were trees. However I’m just not able to bite the bullet and pony up cash for them. Looking around for pre-made scenery, trees are a bit expensive. A long time back I had gotten a bulk pack from woodland scenics where you could construct your own trees. It was a mess to put together and while great for a diorama, it just couldn’t handle the wear and tear for my wargaming table.
One tutorial I dug up described using cleaning pads for pine trees. Just right for my budget, so I jumped right in and looked into making some up. I picked up some scouring pads for less than a dollar and kept some skewers from some street food after a late night of drinking. I liked these skewers as they were thick ¼” diameter wood pieces.
I cut the pads into rows and then in approximately 1 ½” to 2” squares. I then trimmed the square pads into rough circles. I made sure to save a lot of the small corner bits of pad after cutting the major sections into circles. Some of the pads I cut into smaller circles of about 1 inch to serve as the top section of the tree, and followed this up by cutting the tree ‘trunks’ into 3-5” lengths. I found while larger trees are more realistically scaled, they are almost too big for wargaming.
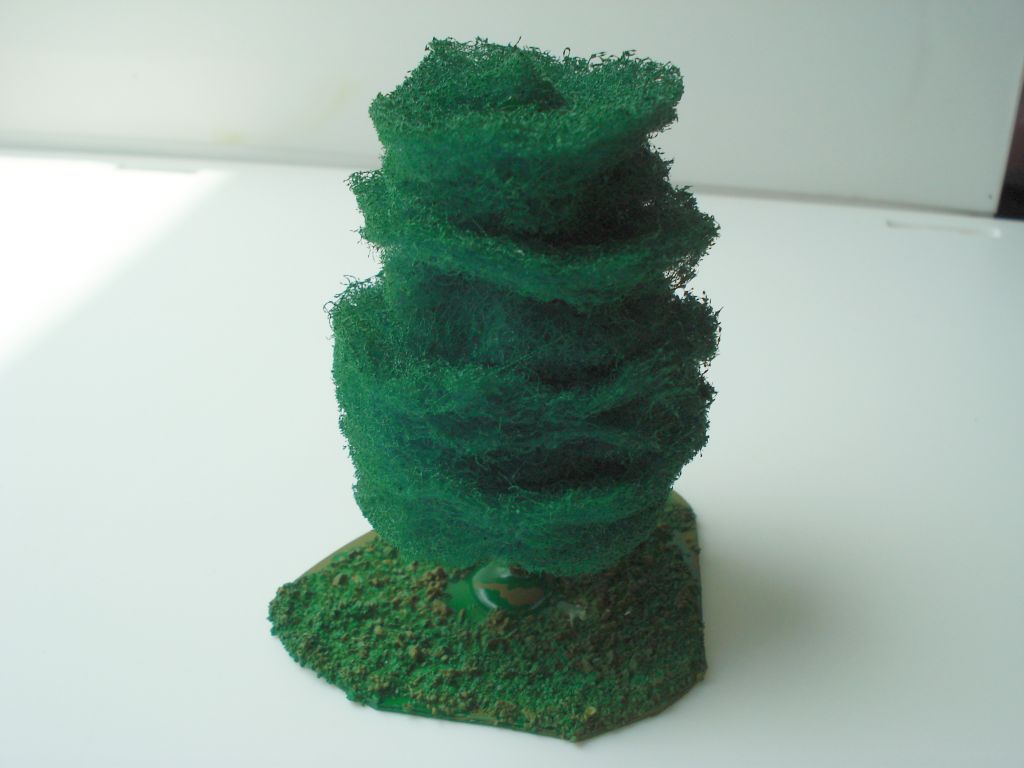
As the I had to get the center wooden piece through the pad sections, I made a small cut in the center of the pads. Then came the more tedious bit. To give the pads some bulk, I teased apart the pad material for each section. This would almost double their thickness by simple pulling the material apart some.
With a hot glue gun, I added a dab to the center dowel and skewered a single pad section, moving it down to little over ½ the length of the wood. I repeated this, adding more glue higher up the wood shaft, adding more sections. I ensured the last section was a smaller diameter circle piece. All in all, I found 4-5 pad sections was enough for the trees to give them some bulk.

For the tops of the trees, I used the leftover parts of the pads from making the circle sections. Really teasing them apart, I could add 2-3 sections to the center wooden piece after placing some hot glue. This gave a nice small tapered top to them.
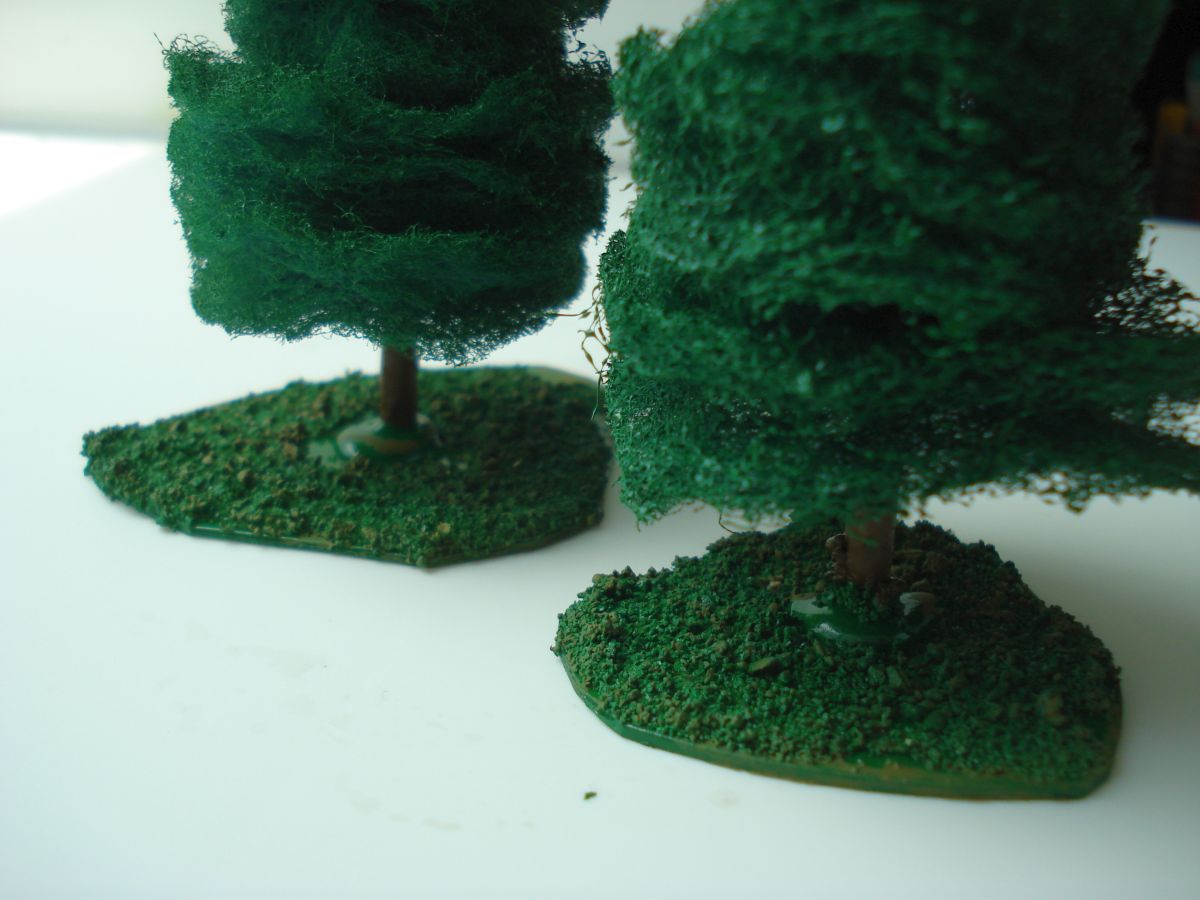
To mount my trees, I cut up some old software CDs, carefully rounding the edges. I placed a thick drop of hot glue in the center and then set the tree on the base. I decided rather than using watered down PVA and flock for the bases, I’d use a drybrush over a layer of modelling ballast. I wanted to do this partially to keep from getting flock all stuck up in the trees and also to ensure the trees could take a little punishment with storage and transporting.

I put down a layer of watered-down PVA glue and after letting the model ballast dry, set to painting it. I gave each tree a good coat of green spray paint. A nice part of this is that the paint will also act as a sort of cement for the ballast, and stiffen up the pad sections of the tree too.
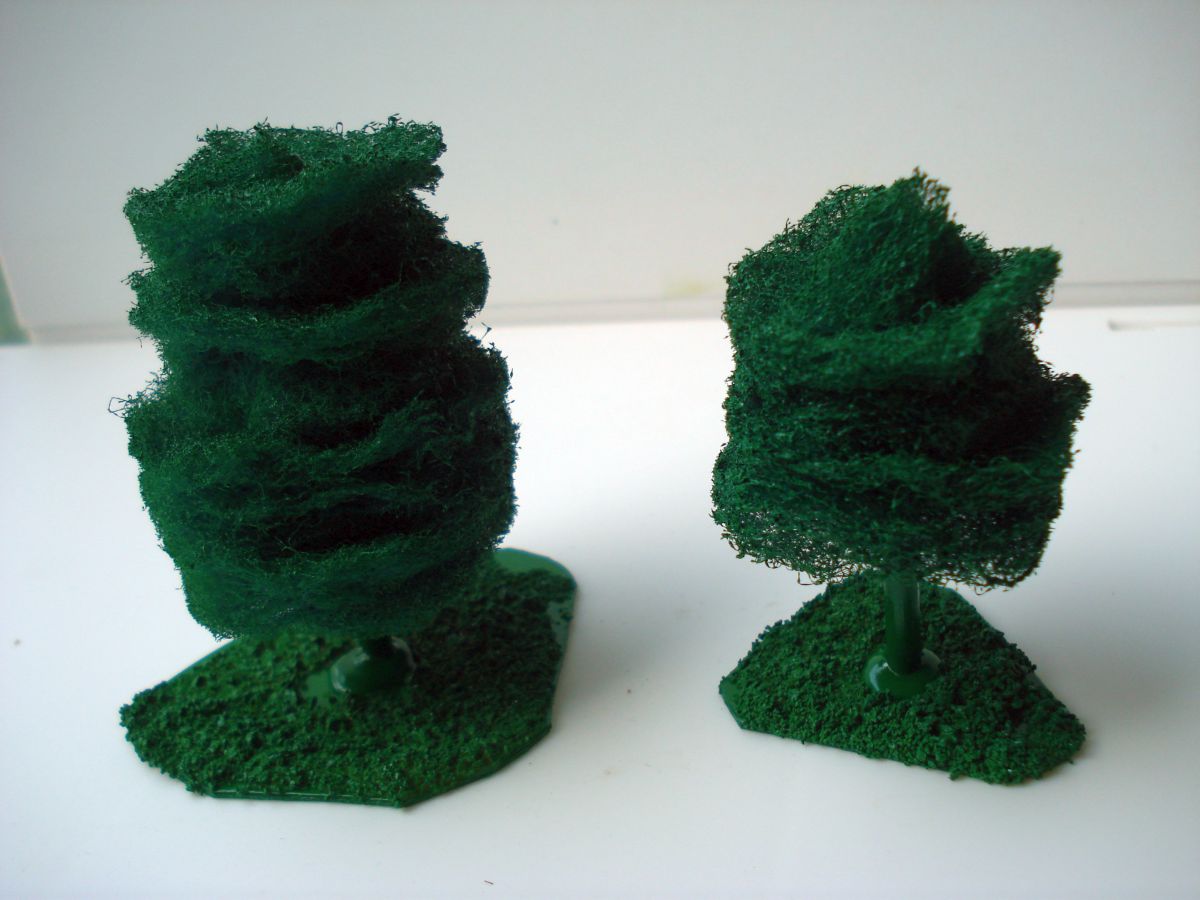
After letting them dry, I painted the trunks a nice brown coat, and followed it up by drybrushing the bases with a lighter green to simulate grass and low brush. More chunks of flock could be added if needed, but overall I liked the effect it gave.
Note I did not highlight the trees any. I feel one solid color, with potentially a wash was enough. Drybrushing the tree leaf sections would likely only highlight the overall pattern of stacked pads even more. With one solid, uniform color of green, the detail of the tree leaf sections are muddled some. Afterwards I went ahead and gave the trees a matte varnish spray.
I think they look pretty decent and you simply cannot beat the price. I may very well likely pick up a few model trees and expect if I mix them in with the lot I made, they will look even better on the tabletop. This was a pretty fun project and an evening’s worth of work (minus the time needed for letting the trees dry due to spray painting). Now to just get some more games in!
Hotz Mats gaming mats
Since I was sorta on a terrain kick making asteroids for Firestorm Armada, I wanted to get a better gaming surface than a black cloth. For a while I heard about Hotz Mats which make a variety of felt gaming mats that can serve for some really nice space tables. They are screen printed and have a variety of options with printed hexes or grids, or even mats that are double-sided with an option for one side being gridless. The mats come in a variety of dimensions with 4’ x 8’ being the largest.
So I went ahead and ordered two mats at 45” x 72’ with one being an earth green mat for my WWII and SAGA stuff, and another deep space mat for my Firestorm Armada games. The mats are felt. However they are supposed to be treated with a fabric binder that reduces the wear and tear of the surface, lessening the pilling you typically see with felt.
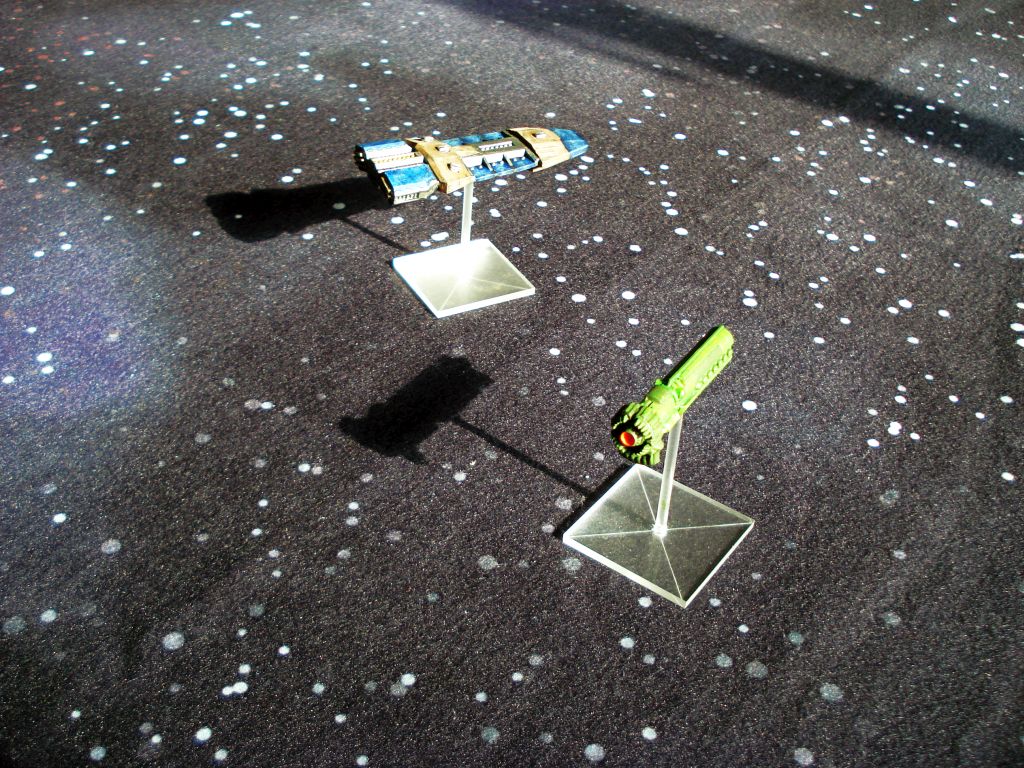
The mats are a decent thickness (if just a tad thin) and can get a bit creased. However really deep folds can be carefully ironed out. The surface of the painted side is somewhat stiff which I assume is the fabric binding material that is sprayed over the surface. This does keep models from snagging up as much compared to regular soft felt. I could push my ship model stands around without having them get caught up on the material.

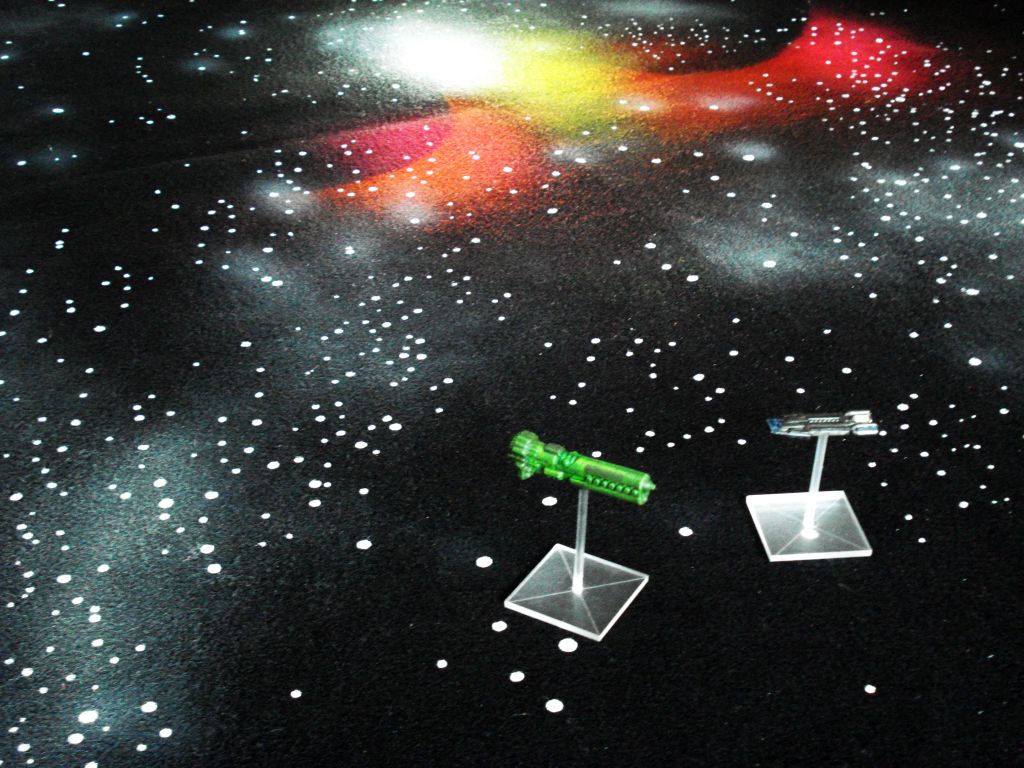
The deep space mat is pretty nice for a generic background. A little color is thrown in aside from the star background which is nice. I think if I were to get another I might splurge for the enhanced deep space mat.
I am a little disappointed with the earth green mat. I was hoping maybe a little extra paint to add some texture to it. However it’s really just a bolt of green felt yet still has the fabric binder coated on it. This gives it a decent surface and likely a hex printed version would serve great. Overall the one I picked up is a plain, muted surface for wargaming.

Now to go a bit on the customer service of Hotz Mats. Bluntly, I found it lacking. I do know they pretty much make the mats custom order. And I would put money on a lot of the mats being done in one go, and maybe needing some time to dry out in the open. Coming from Canada, this might mean delays due to poor weather (humidity) mucking up the production.
It took my order an extra two months to arrive. Email responses from the company were also sporadic and I didn’t get any indication my order was shipped. So I will give a huge caveat for buying their mats directly. It’s going to be delayed. Don’t expect a prompt (or any) response to emails. I can understand production delays, but I’m a little less understanding with the lack of communication. Consider the 3-5 weeks deliver to only be valid if you live within the province.
Now I understand they are moving to a new studio. This might alleviate some production delays. If you order from them, I think you need to take a zen-like approach and just accept that after several months you’ll get what you ordered in the mail.
The game mats are decent, seem like they can take a little punishment, and can easily be stored away. However simply put Hotz mats aren’t worth getting as there are better gaming mats out there that are comparably priced. What really pushed it over into the no buy column for me is the abysmal customer service. Seems you’ll get your mats… eventually… when they decide to get them into production… and bother to ship it. There are other options available for gaming mats which provide much better customer service. I can’t recommend buying Hotz gaming mats.
Asteroid terrain for Firestorm Armada
Living in a Korean city I have an exceedingly hard time getting DIY materials. There just aren’t huge outlet stores like you see in the west (Lowes, Home Depot, etc.). So getting my hands on construction material is a bit of a chore. Also, living in a city means that landscaping material is pretty much impossible to get too. Folks live in apartments so there is literally no customer base here for that type of stuff, hence it’s difficult to pick up gardening supplies.
I think it would be exceedingly easy to pick up pumice rocks or wooden chips as landscaping material, give it a base coat, drybrush highlight, and get a set of great looking asteroid terrain pieces for Firestorm Armada. However I’m sort of stuck with not being able to get material like that easily (or cheaply). So I started looking for alternatives.
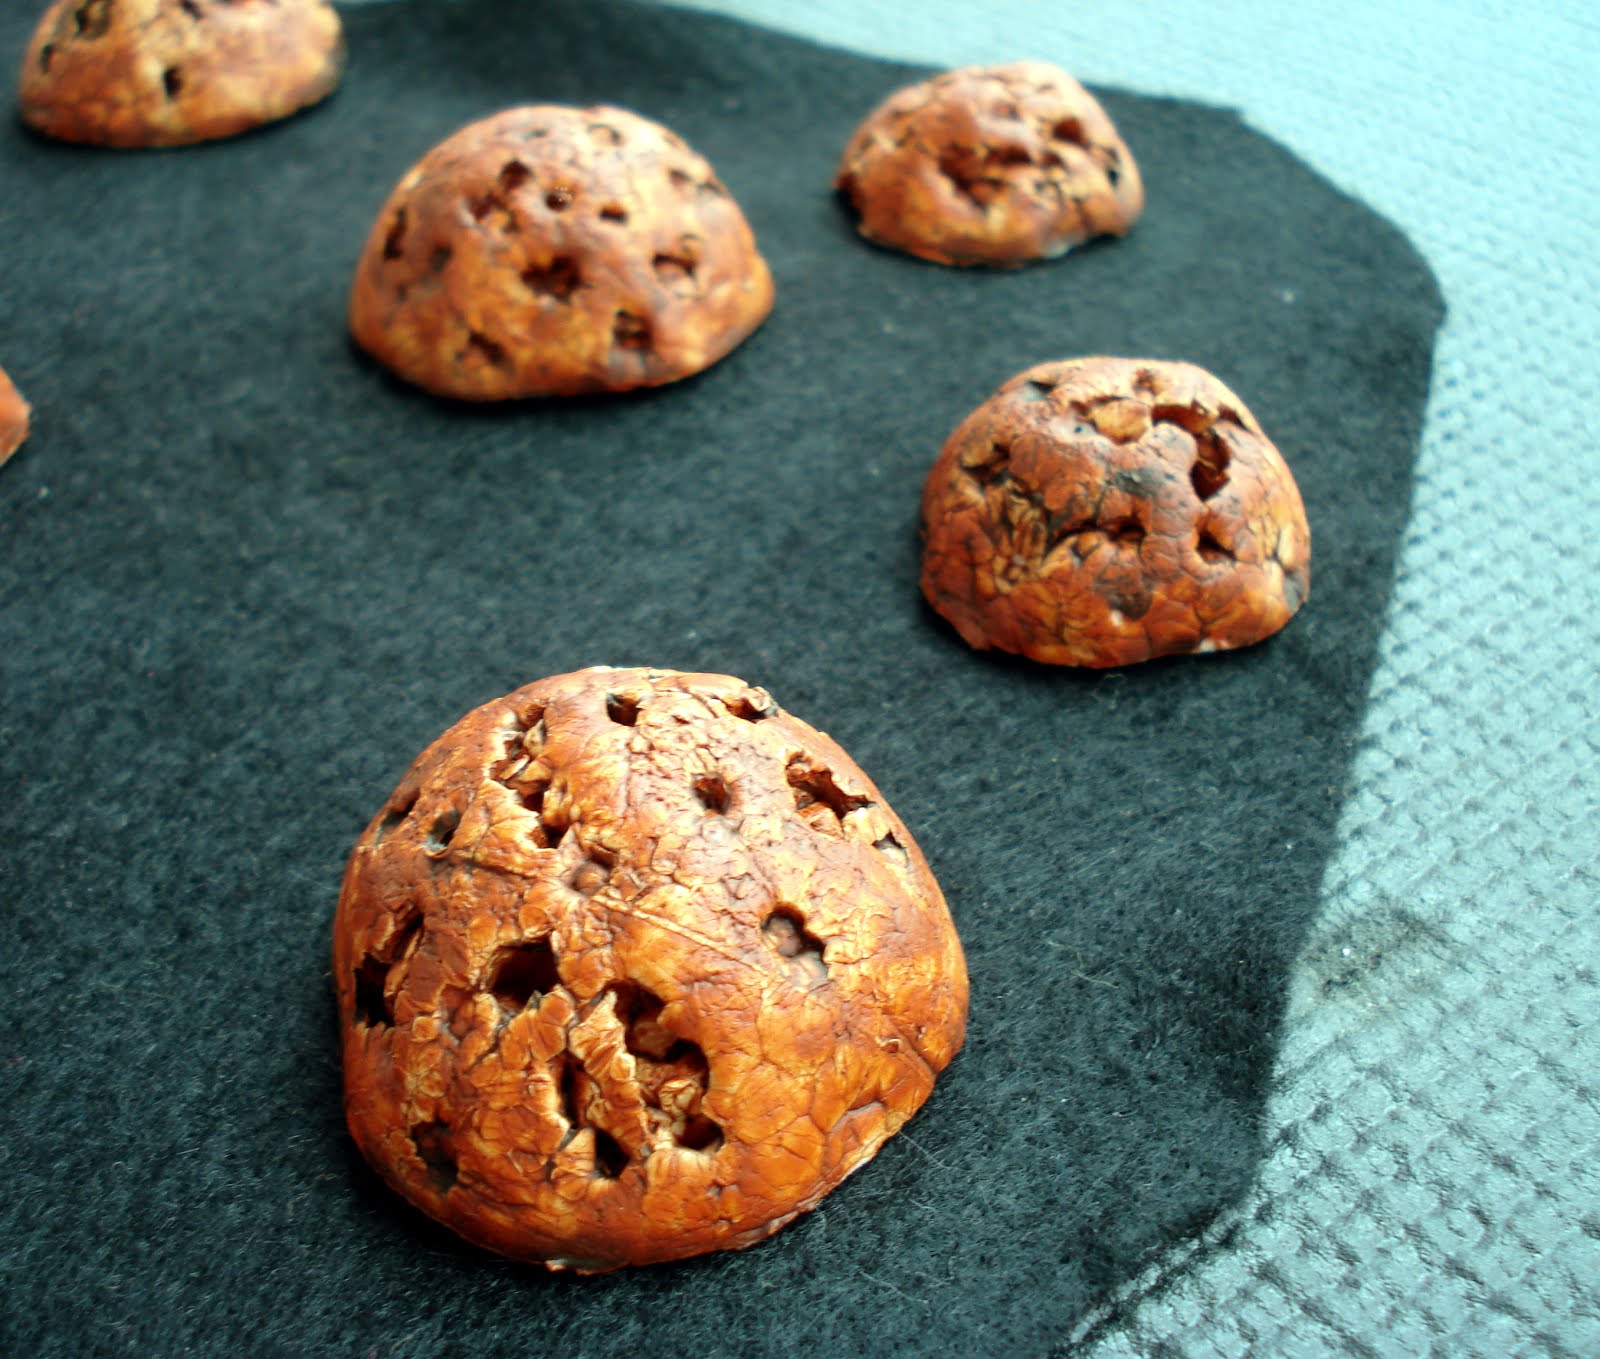
Fortunately, I was able to find an art supply store that had nice supply of styrofoam balls of various sizes. With a bit of compressing and a paint brush handle, I was able to add a bit of texture to the balls once I cut them in half. After quick base coat and wash, I have a nice supply of asteroids to put down on the table.

I also picked up some larger balls that I’ll use for some planetoids. They are a somewhat smaller than the typical planet terrain listed in the FA rule book. You can see one of the larger styrofoam balls in the background for this image. I’ll likely give them a very simple paint job, and despite the smaller size I think they give a neat 3d look compared to a cutout template.
One thing you’ll notice is that I have my asteroids on black felt. As with many of my war games, I am a huge fan of felt. I really like using them to mark roads, woods, fields, rough terrain, etc. I like having very clear boundaries and with FA it’s the same. I can easily layer the felt to create as big a field as needed and have a few smaller sections to make more odd shapes. What really works for this is that I can freely move the asteroid terrain bits around on a set base, allowing models to maneuver where they want, without worrying about altering the perimeter of the field.
Still thinking of possibly adding a few dabs of paint to the felt to give it that star field look. I’m planning on picking up some other colors like a nice purple for nebulas. Now I’ve got some terrain completed, it’s been calling me to get some fleet battles going.
Hill terrain from insulation foam

After making some progress with my 15mm sci-fi troops, I needed to get some terrain together. As always, I’m really on a budget. I’m also hesitant as a likely move is looming in the near future. Keeping the amount of stuff I need to ship low (and light) is weighing on my mind as of late. So really putting a lot of model time into terrain feels sort of a waste, especially if I’ll be throwing out half the stuff I whip up.
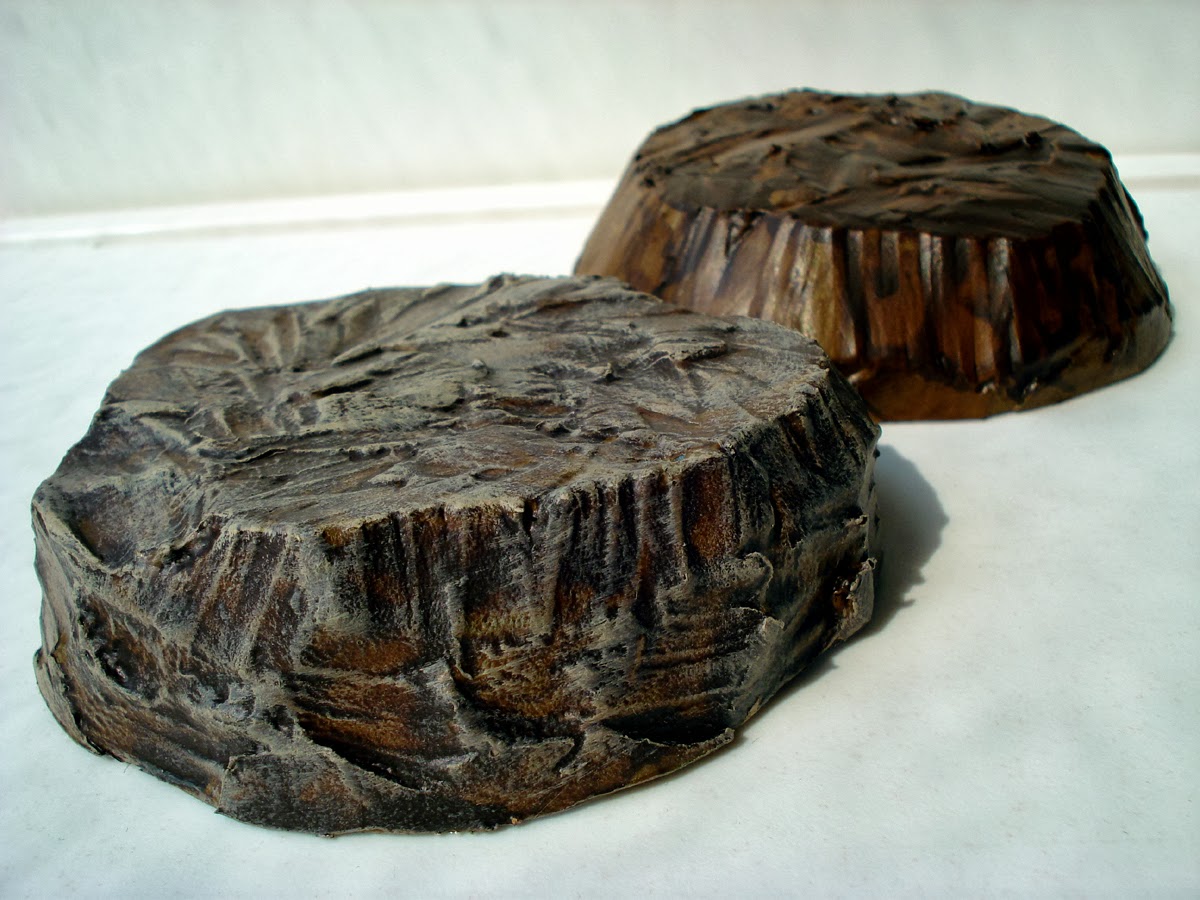
I managed to pick up some packing material made of dense foam insulation material about 3″ thick. As thick cylinders with nice flat sides, taking a knife to the center meant I could get two hills. Roughing up the surface even more with a craft knife left a lot of nice texture with the edges. And a few I cut with an even sharper angle to give one direction a more impassible facing cliff.
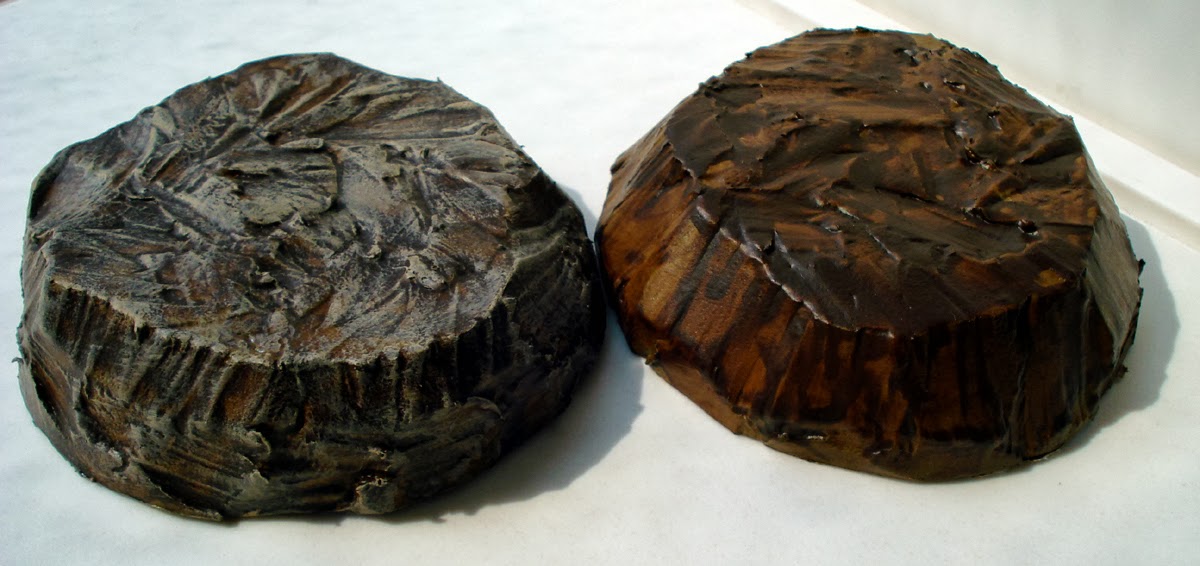
The material was soft however. Using some acrylic paints for canvas and a few coats, I was able to layer on a decent base coat that was more flexible to prevent excessive cracking. A simple wash also brought out more of the crevices and cracks within the cut foam.
A final drybrush really highlighted the texture of the hills. In the image you can see a comparison side by side between a base coat with a wash and one that has been drybrushed. It’s a basic project that turned out pretty well. All it took was a few base coats, a quick wash, and drybrushing. Three basic techniques that can provide you good results in record time.
Top places for miniature wargame supplies in Seoul
While board games and CCGs have a lot of popularity in Korea, miniature wargames seem quite the niche hobby here. A while back during holiday at home I scooped up some of my 15mm Russians for Flames of War. I figured during the winter months I could enjoy some weekend mornings doing a bit of painting and finally get through that pile of unpainted metal I had stored away. When I really started looking around I found it exceptionally difficult getting the typical supplies I wanted for painting and modeling. So I thought I’d share some of my efforts to any expats.
As a first caveat to this, my Korean is abysmal. I am certain if I had a better command of the language the process would be easier tracking down materials. Korea is very much an online shopping country. There are likely places I’ve missed that have a larger online presence than a walk in store mainly due to my ignorance with the local language.
However miniature wargaming also just doesn’t seem that popular of a pastime. There is an immense pressure on kids to study and private academies are all the rage. Free time is limited for kids and parents want them studying more. So pastimes that leave a smaller footprint around the house are likely more popular. It’s far easier for kids to carry around a CCG or sneak off to a PC bang (internet cafe for gaming) rather than lug around a painting bench and throw down a wargame table. It does seem for the folks that wargame, it’s much more popular for college students than for kids in high school.
Stationery and Art Supply Stores – Odd enough, stationery stores may very well carry some modeling and painting supplies. Give them a look and you might pleasantly be surprised. Foamcore board can typically be found as well as colored felt cloth. I’ve snagged packs for Woodland Scenics flock, plastic sheets from Plastruct, balsa wood, and other modeling material too. So you can pick up a few things to help in construction of terrain for your games from these places.
As painting supplies go, you can find a fair amount of brushes and can even get down to 10O sizes for model painting. I’ve even been able to snag some Apple Barrel craft paints. While I don’t use them for mini painting, they make great paints for terrain. So hobby and craft supplies can be picked up at these stationery stores. It just takes a bit of digging.
Neighbor Hobby – This is a fantastic place if military models are your thing as there is a great selection of kits. Unfortunately for fans of Bolt Action, they carry only Tamiya 1/48 models, but they seem to have a full selection from that line. As 1/72 and 1/76 scale kits go though, they have a great selection of tanks, soldiers, and terrain. They also have several 1/72 scale buildings too.
What does this place for me though is the paint selection. There is a wide selection of paints from Testors, Tamiya, AK Interactive, MIG, as well as my go to for miniature painting, Vallejo. It’s a wonderful selection for both brush and airbrush painters. They also carry a complete selection of Testors and Tamiya sprays. They also have brushes and other modelling supplies. Well worth checking out and they do online orders as well.
To get there isn’t too difficult. Take subway line 2 to Hongik University and get off exit number 3. You need to cross the street and footpath park, and then take a side street. Once it ends, then go right and you will hit a main street. From there go left and it will be in an office building on your left.
Orc Town – Likely the most popular wargame store in Seoul, Orc Town is one that is Games Workshop-centric. They also dabble in other game systems like Infinity, Flames of War, Bolt Action, Firestorm Armada, and Dust. What is particularly nice about this store is they carry Citadel paints and supplies, especially matte spray and primer (for typical costs). My biggest complaint is that for some products the prices are horrendously expensive and well above retail (seems to include shipping costs). Because of that, I’ve had a hard time justifying purchasing particular model and rulebooks here compared to buying from an international distributor. Still, having a shop where you can walk in and buy some paints is nice. Having one where you can get a bit of table space for gaming is even nicer.
Tamiya Models – On the first floor of the shopping center at the Yongsan train station is an official Tamiya Model store. For a military wargamer this is a fair place to pick up paints and hobby supplies. They have full stocks of enamel and water-based acrylic paint sets. They also have brushes, cement, and other modeling supplies (plastic styrene sheets and other model building material). I find the prices reasonable for Tamiya model kits and for plastic cement and other modeling tools (which can be a bear to find anywhere locally) it’s a great place to shop.
As the gaming figures go, if you are a Bolt Action fan they have a decent selection of 1/48 scale armor and vehicles along with some figure sets. 1/72 scale options are lacking save for planes and 1/35 is the other popular scale for military models. Additionally scenic materials are also lacking. But if you want to track down a particular 1/48 vehicle or historically accurate paints, the Tamiya store is not a bad choice. 
International distributors – Lastly you can always order online and pony up for international shipping. I have had spray paints sent overseas and worked with many stores over the years. It can be done, but expect some costs for shipping. I’ve always gone the route of making a large ($150-250) order to offset the shipping costs. Getting a few paints is exceedingly expensive. It’s best to wrap more goodies into that shipping charge. Because of this, you want to look around for stores that sell other types of games. While you might save a few dollars from one online store selling just paints, using another that lets you also include board games and RPG books into your order is a better choice.
There is a very small wargaming community in Korea but we exist. Hope those into the hobby can find some of this useful for picking up models and supplies for their bench top.
